Learn to use Memory Wire
Design Jewelry with Confidence!
Seed Beads
Thread, Wire, & Stringing Materials
Athenacast Findings & Components
Everything Else
Assemble Your World
Kits & Collections
Want monthly Beading Happiness?
Subscriptions
Want to learn more?
Explore Today's Promotions!
Seed Beads
Thread, Wire, & Stringing Materials
Findings & Components
Everything Else
Kits & Collections
Subscriptions
Learn to use Memory Wire
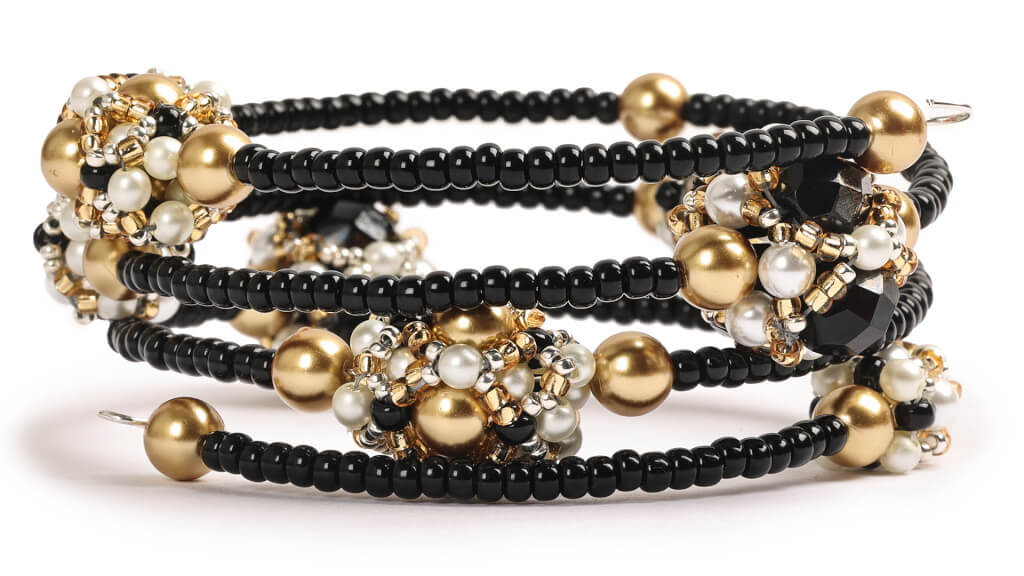
Crafting a memory wire bracelet is a fun and versatile way to showcase your favorite beads and create a piece that’s uniquely yours. Memory wire, with its pre-formed shape, makes designing easy—simply slide on beads like seed beads, Czech glass beads, gemstones, pearls, or even intricately crafted beaded beads. Want to add a little flair? Elevate your bracelet with charms, tassels, or dangles for a personalized touch. Whether you opt for a single wrap or a multi-wrap design, memory wire bracelets are as stylish as they are simple to make.
But memory wire isn’t just for bracelets! This adaptable material can also be used to create matching earrings, giving you the freedom to craft an entire jewelry set. On this page, you’ll find detailed instructions for making memory wire bracelets, along with links to additional projects to spark your creativity. Let’s turn those beads into beautiful, wearable art!
Supplies for a Memory Wire Bracelet
The first step in starting a new jewelry project is to gather your supplies! For a basic memory wire bracelet you will need a selection of beds, memory wire, a charm or tassle (if you want!), memory wire cutters, and needle nose pliers
Using the memory wire cutters, cut the memory wire to the length that you would like for your bracelet.
With the round nose pliers, grab the very end of the memory wire and turn it towards the outside to make a loop. NOTE: If you need to, you can flatten the end slightly with chain nose pliers so its not sticking up. Next, using your chain nose pliers, flatten out the curve of the opposite end of the memory wire so you can easily add beads.
Begin adding beads to the memory wire in whichever pattern you choose. If you'd like to follow our specific pattern, add (5) 11/0s, (1) metal pewter bead, (10) 11/0s, and (1) metal pewter bead. TIP: When you are putting on your beads you can always use your second hand to pull the rest of that coil away from your working hand to allow a little more movement.
Once you have about three loops of the memory wire filled with beads (or however short or long you want your bracelet) trim off the extra wire. NOTE: Be sure when you trim off the end that you leave enough wire in order to make a loop like you did at the beginning. Using round nose pliers, grab the end of the memory wire and turn it towards the outside to make the loop. Make sure the loop is large enough to hold a tassel or charm if you wish to add one.
To attach a tassel or clasp to the end, using chain nose pliers to open the loop on one end just slightly enough to add a tassel or charm. Thread on the tassel or charm and use the pliers to close the loop back up.
Follow Along with a Video Tutorial
Do you prefer to learn by watching? Follow along with Allie has she provides detailed instructions on how to make this simple stackable memory wire bracelet. She will highlight the necessary tools and supplies you will need as well as step by step instructions for the project.
Additional Memory Wire Projects and Tutorials
Do you want more practice? Check out Potomac Bead's collection of memory wire projects.
Become a Better Beader!
The Better Beader episodes from Potomac Bead Company are your go-to resource for mastering beading stitches and choosing the right materials for your projects. Explore essential beading stitch patterns like peyote, herringbone, and brick stitch, while learning how to select the best threads for strength and flexibility.
These episodes also offer expert tips on threading needles, determining how much thread to use, and replacing worn tools. Whether you’re a beginner or an experienced beader, Better Beader provides practical techniques and creative solutions to help you perfect your craft. Start your journey today!
Search our full line of products
Jewelry Making Tips and Tricks
Practice Basic Techniques
Start with simple projects to practice basic techniques before moving on to more complex designs.
Experiment with Color and Texture
Jewelry is a great way to express your personal style, so don’t be afraid to experiment with different colors, textures, and materials. Check out this excellent blog entry to help guide you in choosing colors - 6 Color Theory Tips to Enhance Your Beading Designs!
Stay Organized
Keep your workspace organized by using a bead mat or tray to keep your beads from rolling away and keeping your tools within reach.
Plan Your Design
Before you start creating your jewelry, sketch out your design and gather your materials. This will help you stay organized and ensure you have all the materials you need.
Take Breaks
Jewelry making can be time-consuming and requires a lot of focus. Take frequent breaks to avoid eye strain and hand fatigue.
Don't Be Afraid to Make Mistakes
Making mistakes is part of the learning process. If you make a mistake, don’t be discouraged, take it as an opportunity to learn and improve your skills.
Share Your Creations
Share your creations with others by wearing your jewelry, giving it as gifts, or selling it online. It’s a great way to get feedback and improve your skills.
Potomac Bead is host to a Beading and Jewelry making group of over 80 thousand members of all skill levels. Share projects and ideas, get advice and inspiration from fellow artisans, and see what others are making. Creating is better with friends!
Highest Quality
Products
100% Money
Back Guarantee
Fast
Shipping
Best Teaching &
Customer Service
You'll want these emails...
Get Free Projects & Inspiration
Copyright © PotomacBeads