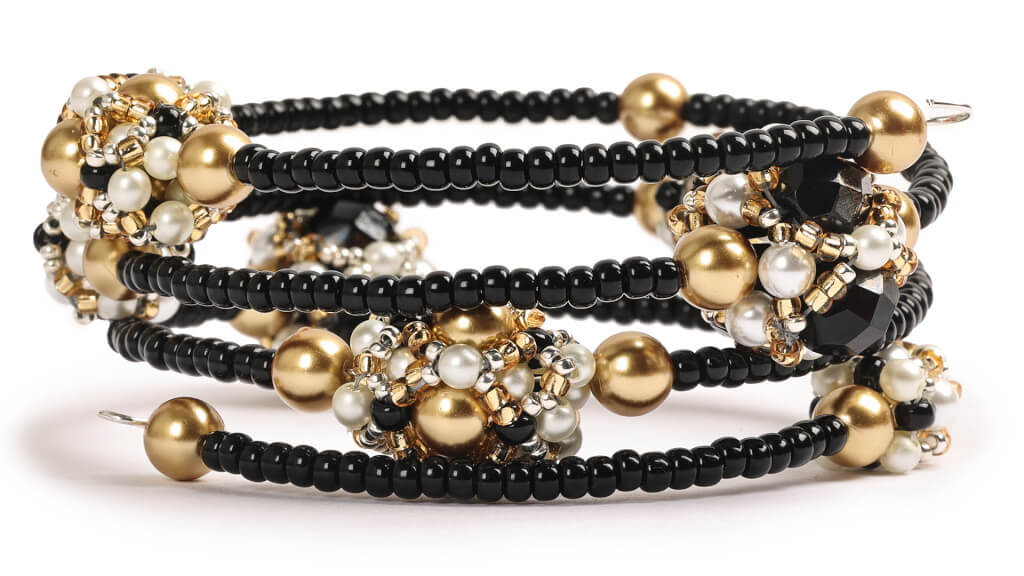
Need pearl inspiration? Reach into your Best Bead Box Kit and grab the supplies for today's Elegant Beaded Beads tutorial. The beads created in this video, can be assembled for a bracelet, necklace, or dropped down from the form ornament you purchased yesterday.
Learn Right Angle Weave Technique: Understand the basic right angle weave to start creating the beaded beads.
Create Beaded Beads: Follow instructions to make individual beaded beads using an 8mm bead surrounded by 11/0 seed beads, and a 4mm bead in the center.
Assemble Beads into Bracelet: Use memory wire to assemble the beaded beads into a bracelet, adding elegance and style to your creation.
Final Touches: Add finishing touches as suggested in the tutorial to enhance the bracelet's appearance and ensure durability.
Learn how to create beautiful and artistic RounDuo Bangle Stacker Bracelets in this DIY jewelry-making tutorial. Using RounDuo or RounDuo Mini beads paired with 11/0, 15/0, and 8/0 seed beads, this video will guide you through each step, from selecting materials to finishing with a clasp or continuous bangle design.
Learn how to create beautiful and artistic RounDuo Bangle Stacker Bracelets in this DIY jewelry-making tutorial. Using RounDuo or RounDuo Mini beads paired with 11/0, 15/0, and 8/0 seed beads, this video will guide you through each step, from selecting materials to finishing with a clasp or continuous bangle design. Perfect for both beginners and advanced beaders, this project allows for endless creativity with color combinations. Shop the materials needed and follow along to create your own unique bracelet!
Glasgow Rose Embroidered Pendant - DIY Jewelry Making Tutorial by PotomacBeads
Glasgow Rose Embroidered Pendant - DIY Jewelry Making Tutorial by PotomacBeads
Watch Anna Tonnesen as she provides detailed step by step tutorial instructions to learn to embroider with beads. Create the Glasgow Rose pendant or create your own masterpiece of DIY jewelry following this project tutorial. Learn how to lay out your embroidery project, cut and shape your surface, sew on beads, apply the backing and seem the sides of the piece.
Comet Earrings - DIY Jewelry Making Tutorial by PotomacBeads
Flower Gem Earrings - DIY Jewelry Making Tutorial by PotomacBeads
Embroidered Rings - DIY Jewelry Making Tutorial by PotomacBeads
Just a beginner so kits are a great way to get started
Share
Michelle W.
04-17-25
Beautiful crystals and an easy site to maneuver. Thank you!
Share
Etta D.
04-17-25
I found just what I needed and I also ordered the wedding bracelet. I look forward to getting all of these items! Thanks, Morrellene Davis, NC.
Share
Janine C.
04-17-25
I love your products. I've been absent for a few years, but I'm back to beading and I had to order from Potomac. You are the best! Thank you for fast delivery so I can get started right away.
Share
Vickie P.
04-17-25
Smooth transaction!
Share
DIANA L.
04-17-25
Very easy.
Share
Charleen B.
04-17-25
I have been shopping with Potomac Beads for years. There are many colors that are exclusive to them along with bead shapes. I also get compliments on their patterns.
Share
Brendalee D.
04-17-25
Long time customer Keep doing what you are doing
Share
Alicia M.
04-17-25
Glad you had what I needed.
Share
Vickie H.
04-17-25
It’s great.
Share
Loading...
Only Visible on Admin Mode
Item Description
Need pearl inspiration? Reach into your Best Bead Box Kit and grab the supplies for today's Elegant Beaded Beads tutorial. The beads created in this video, can be assembled for a bracelet, necklace, or dropped down from the form ornament you purchased yesterday.
Learn Right Angle Weave Technique: Understand the basic right angle weave to start creating the beaded beads.
Create Beaded Beads: Follow instructions to make individual beaded beads using an 8mm bead surrounded by 11/0 seed beads, and a 4mm bead in the center.
Assemble Beads into Bracelet: Use memory wire to assemble the beaded beads into a bracelet, adding elegance and style to your creation.
Final Touches: Add finishing touches as suggested in the tutorial to enhance the bracelet's appearance and ensure durability.
Bullet 1
Bullet 2
Bullet 3
You must be logged in to access the wishlist feature.