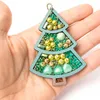
Learn how to make a stunning Christmas Tree Embroidered Ornament in this DIY tutorial by PotomacBeads! Using materials like wooden frames, 11/0 seed beads, and 4mm crystals, you’ll create a dazzling holiday decoration. This step-by-step guide teaches two methods for attaching beads and includes creative embellishments like garland and ornaments. Perfect for jewelry-makers and holiday craft enthusiasts!
Miyuki Seed Beads - Duracoat Galvanized Sea Green 15/0
Step 3: Need More Help? Follow these Steps
Quick Project Steps
Prepare Materials: Collect all supplies listed.
Frame Preparation:
Remove the masking from the wooden frame.
Paint the front of the frame with green and brown markers or paint.
Attach Felt:
Glue the felt backing onto the wooden frame.
Let the glue dry thoroughly.
Seed Bead Decoration:
Attach green 11/0 seed beads to form a gradient pattern, starting from the top.
Secure the thread ends by tying knots.
Add Ornaments:
Either embed 4mm beads during bead placement or sew them on afterward.
Create Garland:
String a mix of silver and gold 11/0 beads to form a draped garland pattern.
Finalize:
Add a hanging loop using seed beads.
Optionally, add embroidery backing for a polished finish.
Learn how to create beautiful and artistic RounDuo Bangle Stacker Bracelets in this DIY jewelry-making tutorial. Using RounDuo or RounDuo Mini beads paired with 11/0, 15/0, and 8/0 seed beads, this video will guide you through each step, from selecting materials to finishing with a clasp or continuous bangle design.
Learn how to create beautiful and artistic RounDuo Bangle Stacker Bracelets in this DIY jewelry-making tutorial. Using RounDuo or RounDuo Mini beads paired with 11/0, 15/0, and 8/0 seed beads, this video will guide you through each step, from selecting materials to finishing with a clasp or continuous bangle design. Perfect for both beginners and advanced beaders, this project allows for endless creativity with color combinations. Shop the materials needed and follow along to create your own unique bracelet!
Glasgow Rose Embroidered Pendant - DIY Jewelry Making Tutorial by PotomacBeads
Glasgow Rose Embroidered Pendant - DIY Jewelry Making Tutorial by PotomacBeads
Watch Anna Tonnesen as she provides detailed step by step tutorial instructions to learn to embroider with beads. Create the Glasgow Rose pendant or create your own masterpiece of DIY jewelry following this project tutorial. Learn how to lay out your embroidery project, cut and shape your surface, sew on beads, apply the backing and seem the sides of the piece.
Comet Earrings - DIY Jewelry Making Tutorial by PotomacBeads
Flower Gem Earrings - DIY Jewelry Making Tutorial by PotomacBeads
Embroidered Rings - DIY Jewelry Making Tutorial by PotomacBeads
Very easy to navigate the website and huge variety. However I don’t like when after placing order asked to purchase additional items.
Share
FABIAN S.
05-01-25
I have not fully finished any projects yet but so far so good
Share
Andromeda P.
05-01-25
Love the beads and styles
Share
Bonnie S.
04-30-25
love buying from potomac beads :)
Share
PAMELA N.
04-30-25
Always a pleasure, Allie, thank you for all your videos too!
Share
Cindy L.
04-30-25
Fast and easy, not a long wait
Share
Jennifer P.
04-30-25
Great ordering experience.
Share
Eugenia B.
04-30-25
Easy process.
Share
Loading...
Only Visible on Admin Mode
Item Description
Learn how to make a stunning Christmas Tree Embroidered Ornament in this DIY tutorial by PotomacBeads! Using materials like wooden frames, 11/0 seed beads, and 4mm crystals, you’ll create a dazzling holiday decoration. This step-by-step guide teaches two methods for attaching beads and includes creative embellishments like garland and ornaments. Perfect for jewelry-makers and holiday craft enthusiasts!
Designer's Material List
The designer's suggested colors & materials:
BeadTec Pendant Ornament Laser Cut | Evergreen Tree Wood Form & Felt Backing, 1 Piece
Miyuki Seed Beads - Duracoat Galvanized Sea Green 15/0
Project Steps
Prepare Materials: Collect all supplies listed.
Frame Preparation:
Remove the masking from the wooden frame.
Paint the front of the frame with green and brown markers or paint.
Attach Felt:
Glue the felt backing onto the wooden frame.
Let the glue dry thoroughly.
Seed Bead Decoration:
Attach green 11/0 seed beads to form a gradient pattern, starting from the top.
Secure the thread ends by tying knots.
Add Ornaments:
Either embed 4mm beads during bead placement or sew them on afterward.
Create Garland:
String a mix of silver and gold 11/0 beads to form a draped garland pattern.
Finalize:
Add a hanging loop using seed beads.
Optionally, add embroidery backing for a polished finish.
Bullet 1
Bullet 2
Bullet 3
You must be logged in to access the wishlist feature.