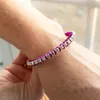
Two Ways to Make a Leather and Crystal Cup Chain Bracelet Tutorial
Discover two creative methods to craft stylish Leather & Crystal Cup Chain Bracelets, combining leather, knotting cords, and crystal cup chains for a modern look. Use leather cords, crystal cup chains (SS16 or SS24 sizes), knotting cords (B-Tec or Dragon Thread), and an Athena cast button for a professional clasp. Learn to tie secure knots, attach cup chains to leather using wrapping and half-hitch knot methods, and finish the bracelets with button clasps. Customize with different cup chain sizes, leather colors, and knotting cords to create unique, versatile designs.
Two Ways to Make a Leather and Crystal Cup Chain Bracelet Tutorial
The designer's suggested colors & materials:
Greek Leather Cord - Brown 2mm, 3 Feet
BeadTec Knotting Cord - Purple .8mm, 4 Feet
BeadTec Knotting Cord - Navy .8mm, 4 Feet
Athenacast Metal Disc Organic Washer Beads | 13mm | Real Silver Plated, 1 Piece
Potomac Crystal Cup Chain SS12 - Sapphire, 8 Inches
Potomac Crystal Cup Chain SS12 - Amethyst, 8 Inches
Step 3: Need More Help? Follow these Steps
Quick Project Steps
Method 1: Wrapping Technique
Prepare Materials:
Gather 2mm leather cord, crystal cup chain (SS16 or SS24), knotting cord (e.g., B-Tec), and an Athena cast button.
Create the Button Loop:
Fold the leather cord in half. Tie a knot at the end to form a loop that fits snugly around the button.
Attach Knotting Cord:
Tie the knotting cord securely near the looped end of the leather cord.
Wrap the Cord Around Cup Chain:
Place the cup chain along the leather cord. Wrap the knotting cord over the cup chain and leather, securing the chain to the leather while keeping the wraps evenly spaced.
Finish Wrapping:
Continue wrapping until the cup chain is securely attached along the length of the bracelet.
Secure and Attach Button:
Tie a knot at the end of the leather cord to secure the wrapping. Burn the knotting cord ends with a lighter to prevent fraying. Attach the button closure by tying the leather into another knot.
Method 2: Half-Hitch Knot Technique
Prepare for Knotting:
Fold 2mm leather cord in half, creating a loop for the button clasp. Tie a knot to secure the loop.
Attach Knotting Cord:
Tie the knotting cord securely to the leather near the loop.
Start Half-Hitch Knots:
Alternate the knotting cord over and under the leather, creating loops that incorporate the cup chain links.
Continue Knotting:
Work down the length of the bracelet, ensuring each knot secures a link of the cup chain.
Finish and Secure:
At the end of the bracelet, tie off the knotting cord securely and burn the ends. Tie a knot with the leather cord to hold the button closure.
Create a double or tripple leather wrap with an extra flair. Use seed beads to create a delicate border to showcase a mosaic of gemstones, crystals and glass. This wrap is comfortable to wear and makes a great piece to take (or make) on a summer vacation destination.
Create a double or tripple leather wrap with an extra flair. Use seed beads to create a delicate border to showcase a mosaic of gemstones, crystals and glass. This wrap is comfortable to wear and makes a great piece to take (or make) on a summer vacation destination.
Glasgow Rose Embroidered Pendant - DIY Jewelry Making Tutorial by PotomacBeads
Glasgow Rose Embroidered Pendant - DIY Jewelry Making Tutorial by PotomacBeads
Watch Anna Tonnesen as she provides detailed step by step tutorial instructions to learn to embroider with beads. Create the Glasgow Rose pendant or create your own masterpiece of DIY jewelry following this project tutorial. Learn how to lay out your embroidery project, cut and shape your surface, sew on beads, apply the backing and seem the sides of the piece.
Comet Earrings - DIY Jewelry Making Tutorial by PotomacBeads
Flower Gem Earrings - DIY Jewelry Making Tutorial by PotomacBeads
Embroidered Rings - DIY Jewelry Making Tutorial by PotomacBeads
It’s very easy to shop here. Quality beads and quick delivery! I love Potomac Beads!
Share
Pauline L.
05-05-25
Quick and easy. The problem is there are too many things to choose from
Share
Lenora S.
05-05-25
On-line shopping is easy and can usually find what I'm looking for.
Share
Lori F.
05-05-25
Thank you for all your help with my orders
Share
Kimberly F.
05-05-25
Potomac's site is so easy to navigate and find what you are looking for.
Share
David J.
05-05-25
Good
Share
Linda J.
05-05-25
Easy to follow what I wanted
Share
Jay B.
05-05-25
Huge inventory. Site easy to navigate. Quality selections.
Share
Linda D.
05-05-25
Good service, quick fulfillment.
Share
Loading...
Only Visible on Admin Mode
Item Description
Discover two creative methods to craft stylish Leather & Crystal Cup Chain Bracelets, combining leather, knotting cords, and crystal cup chains for a modern look. Use leather cords, crystal cup chains (SS16 or SS24 sizes), knotting cords (B-Tec or Dragon Thread), and an Athena cast button for a professional clasp. Learn to tie secure knots, attach cup chains to leather using wrapping and half-hitch knot methods, and finish the bracelets with button clasps. Customize with different cup chain sizes, leather colors, and knotting cords to create unique, versatile designs.
Designer's Material List
The designer's suggested colors & materials:
Greek Leather Cord - Brown 2mm, 3 Feet
BeadTec Knotting Cord - Purple .8mm, 4 Feet
BeadTec Knotting Cord - Navy .8mm, 4 Feet
Athenacast Metal Disc Organic Washer Beads | 13mm | Real Silver Plated, 1 Piece
Potomac Crystal Cup Chain SS12 - Sapphire, 8 Inches
Potomac Crystal Cup Chain SS12 - Amethyst, 8 Inches
Project Steps
Method 1: Wrapping Technique
Prepare Materials:
Gather 2mm leather cord, crystal cup chain (SS16 or SS24), knotting cord (e.g., B-Tec), and an Athena cast button.
Create the Button Loop:
Fold the leather cord in half. Tie a knot at the end to form a loop that fits snugly around the button.
Attach Knotting Cord:
Tie the knotting cord securely near the looped end of the leather cord.
Wrap the Cord Around Cup Chain:
Place the cup chain along the leather cord. Wrap the knotting cord over the cup chain and leather, securing the chain to the leather while keeping the wraps evenly spaced.
Finish Wrapping:
Continue wrapping until the cup chain is securely attached along the length of the bracelet.
Secure and Attach Button:
Tie a knot at the end of the leather cord to secure the wrapping. Burn the knotting cord ends with a lighter to prevent fraying. Attach the button closure by tying the leather into another knot.
Method 2: Half-Hitch Knot Technique
Prepare for Knotting:
Fold 2mm leather cord in half, creating a loop for the button clasp. Tie a knot to secure the loop.
Attach Knotting Cord:
Tie the knotting cord securely to the leather near the loop.
Start Half-Hitch Knots:
Alternate the knotting cord over and under the leather, creating loops that incorporate the cup chain links.
Continue Knotting:
Work down the length of the bracelet, ensuring each knot secures a link of the cup chain.
Finish and Secure:
At the end of the bracelet, tie off the knotting cord securely and burn the ends. Tie a knot with the leather cord to hold the button closure.
Bullet 1
Bullet 2
Bullet 3
You must be logged in to access the wishlist feature.