Create elegant stud earrings using cup buttons. These earrings are versatile, quick to make, and can be customized for various occasions. Use cup buttons, E6000 adhesive, post earring backs, bead caps, pearls, and a needle for excess glue removal. Learn how to attach the cup buttons to post backs, embellish with bead caps, and secure pearls for a polished look. Experiment with different cup button finishes, bead caps, and decorative additions for unique designs.
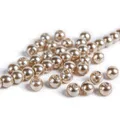
Freshwater Pearls A Grade Round 3-4mm White/Natural, 2 Pearls
E6000 Adhesive .18 Fl oz
Potomac Crystal Rose Montees - Crystal | SS12, 2 Pieces
Step 3: Need More Help? Follow these Steps
Quick Project Steps
Gather Materials:
Cup buttons (2). Post earring backs (2). E6000 adhesive. Bead caps (2). Pearls or crystals (2). Needle or wire (for cleaning excess glue).
Prepare the Post Back:
Add a small dollop of E6000 adhesive to the flat pad of the earring post. Press the post firmly onto the back of the cup button and allow it to set for a few minutes.
Apply Glue Inside the Cup Button:
Use E6000 to coat the inside of the cup button lightly. Ensure the glue is evenly spread for secure attachment of the next components.
Attach the Bead Cap:
Insert the bead cap into the cup button, aligning it with the button’s curvature. Press gently to secure it in place.
Add the Pearl or Crystal:
Apply a small amount of glue inside the bead cap. Place a pearl or crystal on top of the glue and press lightly.
Allow to Dry:
Let the earrings sit upright to dry. Use a thread, counter gap, or any stable surface to ensure the earrings dry in place.
Clean Excess Glue:
Use a needle or wire to remove any visible glue from around the edges for a neat finish.
Finalize the Design:
Once dry, check the alignment of all components. Your Cup Button Stud Earrings are ready to wear or gift!
Create a double or tripple leather wrap with an extra flair. Use seed beads to create a delicate border to showcase a mosaic of gemstones, crystals and glass. This wrap is comfortable to wear and makes a great piece to take (or make) on a summer vacation destination.
Create a double or tripple leather wrap with an extra flair. Use seed beads to create a delicate border to showcase a mosaic of gemstones, crystals and glass. This wrap is comfortable to wear and makes a great piece to take (or make) on a summer vacation destination.
Glasgow Rose Embroidered Pendant - DIY Jewelry Making Tutorial by PotomacBeads
Glasgow Rose Embroidered Pendant - DIY Jewelry Making Tutorial by PotomacBeads
Watch Anna Tonnesen as she provides detailed step by step tutorial instructions to learn to embroider with beads. Create the Glasgow Rose pendant or create your own masterpiece of DIY jewelry following this project tutorial. Learn how to lay out your embroidery project, cut and shape your surface, sew on beads, apply the backing and seem the sides of the piece.
Comet Earrings - DIY Jewelry Making Tutorial by PotomacBeads
Flower Gem Earrings - DIY Jewelry Making Tutorial by PotomacBeads
Embroidered Rings - DIY Jewelry Making Tutorial by PotomacBeads
Love the selections and the video lessons. It gives me confidence to try harder patterns
Share
Wendy S.
05-04-25
Very beautiful website.
Share
Karen V.
05-04-25
Good product, great colors and verity.
Share
Samantha P.
05-04-25
Easy checkout process
Share
Angelica S.
05-04-25
Very easy to use the website and complete purchases.
Share
Sue G.
05-04-25
Shopping is very easy and it is WAY too easy for me to keep adding to my cart! :)
Share
Linda H.
05-04-25
First time here but it was very nice and wonderful patterns
Share
Sallie H.
05-04-25
Great price, easy ordering process and quick delivery. Kit was complete which I didn't expect.
Share
Kristine E.
05-04-25
I lovr shopping with Potomac Beads because I know I am getting great quality product, at fair pricing.
Share
Margarita M.
05-04-25
Great selection
Share
Loading...
Only Visible on Admin Mode
Item Description
Create elegant stud earrings using cup buttons. These earrings are versatile, quick to make, and can be customized for various occasions. Use cup buttons, E6000 adhesive, post earring backs, bead caps, pearls, and a needle for excess glue removal. Learn how to attach the cup buttons to post backs, embellish with bead caps, and secure pearls for a polished look. Experiment with different cup button finishes, bead caps, and decorative additions for unique designs.
Freshwater Pearls A Grade Round 3-4mm White/Natural, 2 Pearls
E6000 Adhesive .18 Fl oz
Potomac Crystal Rose Montees - Crystal | SS12, 2 Pieces
Project Steps
Gather Materials:
Cup buttons (2). Post earring backs (2). E6000 adhesive. Bead caps (2). Pearls or crystals (2). Needle or wire (for cleaning excess glue).
Prepare the Post Back:
Add a small dollop of E6000 adhesive to the flat pad of the earring post. Press the post firmly onto the back of the cup button and allow it to set for a few minutes.
Apply Glue Inside the Cup Button:
Use E6000 to coat the inside of the cup button lightly. Ensure the glue is evenly spread for secure attachment of the next components.
Attach the Bead Cap:
Insert the bead cap into the cup button, aligning it with the button’s curvature. Press gently to secure it in place.
Add the Pearl or Crystal:
Apply a small amount of glue inside the bead cap. Place a pearl or crystal on top of the glue and press lightly.
Allow to Dry:
Let the earrings sit upright to dry. Use a thread, counter gap, or any stable surface to ensure the earrings dry in place.
Clean Excess Glue:
Use a needle or wire to remove any visible glue from around the edges for a neat finish.
Finalize the Design:
Once dry, check the alignment of all components. Your Cup Button Stud Earrings are ready to wear or gift!
Bullet 1
Bullet 2
Bullet 3
You must be logged in to access the wishlist feature.