• Jewelry-Making Supplies
  • Kits & Collections
  • Subscriptions
  • Learn to Make
  • Discounts & Deals

Princess Alice Brooch Tutorial

Learn to create a stunning brooch featuring RounDuo mini beads, crystals, and seed beads. This versatile design can also be adapted into a bracelet, necklace, or hair accessory. Use RounDuo mini beads, Miyuki 11/0 and 15/0 seed beads, 4mm crystals, Dragon Thread, and a brooch backing for this intricate project. Master techniques like stop bead placement, layered beadwork, and crystal embellishments to create an eye-catching brooch. Customize with different bead colors, patterns, or add a hair clip backing for an alternative use.

Step 1: Choose Your Materials

Step 2: Watch the 
Video Tutorial

Princess Alice Brooch Tutorial
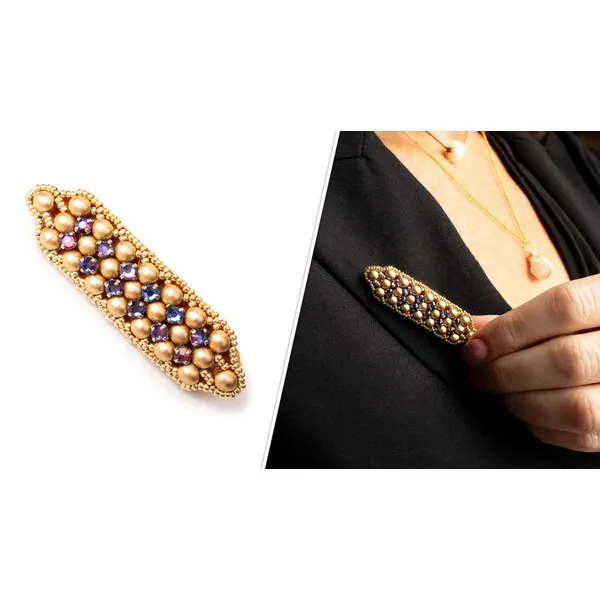
The designer's suggested colors & materials:
  • RounDuo Mini Beads - Aztec Gold 4mm, 23 Beads
  • Miyuki Seed Beads - Galvanized Gold 15/0, ~1 Gram
  • Potomac Crystal Rose Montees - Colorshift Sphinx | SS12, 12 Pieces
  • BeadTec Embroidery Felt - Brown 4.25"x5.5", 1 Piece
  • Pin Backs - Premium 24kt Gold Plating, 1 Piece
  • Step 3: Need More Help? Follow these Steps

    steps

    Quick Project Steps

    Gather Materials: RounDuo mini beads. Miyuki 11/0 and 15/0 seed beads. 4mm crystals for embellishments. Dragon Thread. Brooch backing or pin. E6000 glue. Set Up the Thread: Attach a stop bead to your thread, leaving a tail for later finishing. Create the Base: Pick up one RounDuo mini bead and secure it in place by threading back through the same hole. Alternate three seed beads and one RounDuo mini to create a circle. Add Layers: Use the open holes of the RounDuo mini beads to add additional rows. Connect the beads with seed beads to create a layered design. Embellish with Crystals: Add crystals diagonally across the framework for sparkle. Ensure the crystals sit securely and evenly. Attach the Brooch Backing: Cut a piece of thick felt or fabric backing to match the brooch size. Glue the beadwork onto the backing using E6000 glue. Secure the Brooch Pin: Attach the pin to the backing using glue or stitching. Ensure the pin is centered and aligned for ease of use. Finalize the Design: Adjust threads, tighten the beadwork, and let the glue dry completely. Trim any excess backing or thread for a clean finish.

    Step 5: Need Any Extra Materials?

    • Potomacbeads Beading Ruler | Ultimate | Crystal | 9x3"
    • BeadTec DragonThread - Four Color Selection Size 8 50 Meter Spool
    • BeadTec DragonThread - Four Dark Color Selection | Size 6 (Medium) | 50 Meter Spool
    • Plastic Caliper Tool - White
    • BeadTec Beading Needles Sizes 10, 11, 12 | Mix Pack of 6
    • Thread Zap II

    Step 5: Need Any Extra Materials?

    BeadTec Beading Ruler | Advanced | 6x3"
    Princess Alice Brooch Tutorial
    PotomacBeads Pliers - Round Nose Pliers

    Step 6: Choose Your Next Project

    • Learn how to create beautiful and artistic RounDuo Bangle Stacker Bracelets in this DIY jewelry-making tutorial. Using RounDuo or RounDuo Mini beads paired with 11/0, 15/0, and 8/0 seed beads, this video will guide you through each step, from selecting materials to finishing with a clasp or continuous bangle design.

      Read More

    Step 6: Choose Your Next Project

    • Glasgow Rose Embroidered Pendant - DIY Jewelry Making Tutorial by PotomacBeads
    • Glasgow Rose Embroidered Pendant - DIY Jewelry Making Tutorial by PotomacBeads

    Watch Anna Tonnesen as she provides detailed step by step tutorial instructions to learn to embroider with beads. Create the Glasgow Rose pendant or create your own masterpiece of DIY jewelry following this project tutorial. Learn how to lay out your embroidery project, cut and shape your surface, sew on beads, apply the backing and seem the sides of the piece.
    • Comet Earrings - DIY Jewelry Making Tutorial by PotomacBeads
    • Flower Gem Earrings - DIY Jewelry Making Tutorial by PotomacBeads
    • Embroidered Rings - DIY Jewelry Making Tutorial by PotomacBeads

    Join Our Growing Community

    Community profile photo 1
    Community profile photo 2
    Community profile photo 3
    Community profile photo 4

    Our Testimonials

    • 5
      5708 (83.7%)
    • 4
      771 (11.3%)
    • 3
      283 (4.2%)
    • 2
      29 (0.4%)
    • 1
      26 (0.4%)
    95% of customers rate this company 4- or 5-stars
    Newest to Oldest
    • Favorite Reviews
    • Highest to Lowest
    • Newest to Oldest
    All Ratings
    • All Ratings
    • 5 ★ Reviews
    • 4 ★ Reviews
    • 3 ★ Reviews
    • 2 ★ Reviews
    • 1 ★ Reviews
    Vicky Verified Customer
    04-10-25

    Very easy to find what I was looking for.

    Erin G. Verified Customer
    04-10-25

    Just finishing a purchase set up earlier. Your website is very easy to navigate.

    April M. Verified Customer
    04-09-25

    Very easy to find what I needed

    Marianne B. Verified Customer
    04-09-25

    my shopping experience went very smoothly.

    Donna S. Verified Customer
    04-09-25

    Love the variety of different projects with the tutorials and associated shopping lists! Great selection of beads!!

    Mary S. Verified Customer
    04-09-25

    Love these beads

    Charlene F. Verified Customer
    04-09-25

    easy to find what I was looking for.

    Sherry M. Verified Customer
    04-09-25

    Quick and easy.

    Dena H. Verified Customer
    04-09-25

    You guys are great! You usually have what I need! You get my order to me in a timely fashion!! Thank you!

    Laura W. Verified Customer
    04-09-25

    Love your beads and findings

    Only Visible on Admin Mode

    Item Description

    Learn to create a stunning brooch featuring RounDuo mini beads, crystals, and seed beads. This versatile design can also be adapted into a bracelet, necklace, or hair accessory. Use RounDuo mini beads, Miyuki 11/0 and 15/0 seed beads, 4mm crystals, Dragon Thread, and a brooch backing for this intricate project. Master techniques like stop bead placement, layered beadwork, and crystal embellishments to create an eye-catching brooch. Customize with different bead colors, patterns, or add a hair clip backing for an alternative use.

    Designer's Material List

    The designer's suggested colors & materials:
  • RounDuo Mini Beads - Aztec Gold 4mm, 23 Beads
  • Miyuki Seed Beads - Galvanized Gold 15/0, ~1 Gram
  • Potomac Crystal Rose Montees - Colorshift Sphinx | SS12, 12 Pieces
  • BeadTec Embroidery Felt - Brown 4.25"x5.5", 1 Piece
  • Pin Backs - Premium 24kt Gold Plating, 1 Piece
  • Project Steps

    Gather Materials: RounDuo mini beads. Miyuki 11/0 and 15/0 seed beads. 4mm crystals for embellishments. Dragon Thread. Brooch backing or pin. E6000 glue. Set Up the Thread: Attach a stop bead to your thread, leaving a tail for later finishing. Create the Base: Pick up one RounDuo mini bead and secure it in place by threading back through the same hole. Alternate three seed beads and one RounDuo mini to create a circle. Add Layers: Use the open holes of the RounDuo mini beads to add additional rows. Connect the beads with seed beads to create a layered design. Embellish with Crystals: Add crystals diagonally across the framework for sparkle. Ensure the crystals sit securely and evenly. Attach the Brooch Backing: Cut a piece of thick felt or fabric backing to match the brooch size. Glue the beadwork onto the backing using E6000 glue. Secure the Brooch Pin: Attach the pin to the backing using glue or stitching. Ensure the pin is centered and aligned for ease of use. Finalize the Design: Adjust threads, tighten the beadwork, and let the glue dry completely. Trim any excess backing or thread for a clean finish.