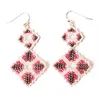
Create stunning Cubic Mark Earrings with this detailed DIY jewelry-making tutorial from PotomacBeads. Using Potomac Crystal 3mm cube beads and Miyuki Delica seed beads in colors like Opaque Sea Opal AB and Aqua Mist Lined Crystal, this project teaches you essential beadweaving techniques, including the herringbone stitch. Follow along step-by-step to craft elegant earrings that are perfect for any occasion. Whether you're an experienced beader or just starting, this tutorial will guide you through the entire process, from selecting materials to finishing your unique piece.
Gather Materials: Prepare Potomac Crystal 3mm cube beads, Miyuki Delica seed beads in three colors, Dragonthread, wire guards, and ear wires.
Thread Preparation: Cut an arm’s length of Dragonthread, thread your needle, and begin working with the large component.
Large Component - Initial Setup: String a sequence of cube and Delica beads, forming a square. Use herringbone stitch to build the beadwork, ensuring proper alignment and tension.
Picot Trim: Add decorative picot trim using additional seed beads, ensuring a neat and even finish.
Complete Large Component: Weave through beads to secure the pattern, finish the component, and tie off the thread.
Create Small Component: Repeat the initial steps on a smaller scale, mirroring the large component’s design.
Assemble Earring: Attach the small component to the large one, using wire guards for added durability.
Add Ear Wires: Attach the ear wires using pliers, ensuring they are securely fastened.
Final Adjustments: Inspect the earring, make any necessary adjustments, and reinforce where needed.
Learn how to create beautiful and artistic RounDuo Bangle Stacker Bracelets in this DIY jewelry-making tutorial. Using RounDuo or RounDuo Mini beads paired with 11/0, 15/0, and 8/0 seed beads, this video will guide you through each step, from selecting materials to finishing with a clasp or continuous bangle design.
Learn how to create beautiful and artistic RounDuo Bangle Stacker Bracelets in this DIY jewelry-making tutorial. Using RounDuo or RounDuo Mini beads paired with 11/0, 15/0, and 8/0 seed beads, this video will guide you through each step, from selecting materials to finishing with a clasp or continuous bangle design. Perfect for both beginners and advanced beaders, this project allows for endless creativity with color combinations. Shop the materials needed and follow along to create your own unique bracelet!
Glasgow Rose Embroidered Pendant - DIY Jewelry Making Tutorial by PotomacBeads
Glasgow Rose Embroidered Pendant - DIY Jewelry Making Tutorial by PotomacBeads
Watch Anna Tonnesen as she provides detailed step by step tutorial instructions to learn to embroider with beads. Create the Glasgow Rose pendant or create your own masterpiece of DIY jewelry following this project tutorial. Learn how to lay out your embroidery project, cut and shape your surface, sew on beads, apply the backing and seem the sides of the piece.
Comet Earrings - DIY Jewelry Making Tutorial by PotomacBeads
Flower Gem Earrings - DIY Jewelry Making Tutorial by PotomacBeads
Embroidered Rings - DIY Jewelry Making Tutorial by PotomacBeads
It's very easy to shop here. Quality beads and quick delivery! I love Potomac Beads!
Share
Linda R.
05-15-25
Great experience, especially when the items I want are in stock!
Share
Cynthia D.
05-15-25
Thanks for getting back to me. Everything I ordered was in stock.
Share
Beverly
05-15-25
I love everything about Potomac beads, except for the dragon fire white thread. I bought the time before it was a 250 spool and I bought 5 pound because the 6 pound I had was just humongous you've done some changing with your threads since the last time I bought some. I fell and broke my right arm and my rotator cuff and wasn't able to be for quite a while. I just pulled out the 5 pound white thread. I bought the time before and tried it. I don't even think I could bezel with it. The 6 pound does beautiful. I took one arm span of thread off the spool and I won't be using it. It's a shame because I truly love yours thread.
Enjoy looking at your selections and finding something unusual.
Share
Linda J.
05-15-25
Easy to follow what I wanted. I subscribed for the Tresure box. I received it Wednesday . I was thrilled with my box. Patomac Beads.com were very efficient and a fast delivery. I cannot recommend you enough.
Share
Jacklyn F.
05-15-25
Very easy
Share
Susie J.
05-15-25
Easy.
Share
Loading...
Only Visible on Admin Mode
Item Description
Create stunning Cubic Mark Earrings with this detailed DIY jewelry-making tutorial from PotomacBeads. Using Potomac Crystal 3mm cube beads and Miyuki Delica seed beads in colors like Opaque Sea Opal AB and Aqua Mist Lined Crystal, this project teaches you essential beadweaving techniques, including the herringbone stitch. Follow along step-by-step to craft elegant earrings that are perfect for any occasion. Whether you're an experienced beader or just starting, this tutorial will guide you through the entire process, from selecting materials to finishing your unique piece.
Designer's Material List
The designer's suggested colors & materials:
Potomac crystal 3mm cube - blue zircon AB, 32 beads
Gather Materials: Prepare Potomac Crystal 3mm cube beads, Miyuki Delica seed beads in three colors, Dragonthread, wire guards, and ear wires.
Thread Preparation: Cut an arm’s length of Dragonthread, thread your needle, and begin working with the large component.
Large Component - Initial Setup: String a sequence of cube and Delica beads, forming a square. Use herringbone stitch to build the beadwork, ensuring proper alignment and tension.
Picot Trim: Add decorative picot trim using additional seed beads, ensuring a neat and even finish.
Complete Large Component: Weave through beads to secure the pattern, finish the component, and tie off the thread.
Create Small Component: Repeat the initial steps on a smaller scale, mirroring the large component’s design.
Assemble Earring: Attach the small component to the large one, using wire guards for added durability.
Add Ear Wires: Attach the ear wires using pliers, ensuring they are securely fastened.
Final Adjustments: Inspect the earring, make any necessary adjustments, and reinforce where needed.
Bullet 1
Bullet 2
Bullet 3
You must be logged in to access the wishlist feature.