• Jewelry-Making Supplies
  • Kits & Collections
  • Subscriptions
  • Learn to Make
  • Discounts & Deals

Long Fringe Earrings with Multiple Bead Sizes Tutorial

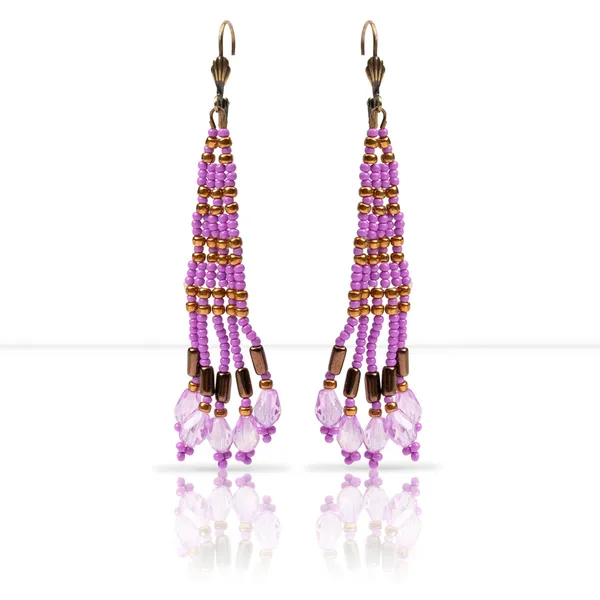
Create the Long Fringe Earrings, a lightweight and eye-catching accessory combining multiple bead sizes and textured fringe. This tutorial covers essential techniques including ladder stitch, brick stitch, and fringe work, using DragonThread, 11/0 and 8/0 seed beads, tublet beads, and crystal drops. Learn how to layer fringe lengths, create balanced triangular forms, and adapt brick stitch tension across different bead sizes. Finish the piece with a wire guard and earwire attachment. These earrings are versatile, perfect for summer styles, and easily customized with various color schemes or bead shapes.

Step 1: Choose Your Materials

Step 2: Watch the 
Video Tutorial

Long Fringe Earrings with Multiple Bead Sizes Tutorial
The designer's suggested colors & materials:
  • Potomac Crystal Teardrop Beads - Alexandrite AB 6x8mm, 10 Beads
  • Tubelet Beads - Jet Bronze, 10 Beads
  • Miyuki Seed Beads - Metallic Light Bronze 8/0, ~1 Gram
  • Azuki Seed Beads - Opaque Orchid Size 11/0, ~1 Gram
  • Athenacast Wire Guard Protectors - 4.5x4mm Premium Antique Brass Plated Stainless Steel, 2 Pieces
  • Athenacast Earwires Leverback - 18mm Premium Antique Copper Plated Brass, 2 Pieces
  • Step 3: Need More Help? Follow these Steps

    steps

    Quick Project Steps

    Prepare Materials: Use size 6 DragonThread, about 4 feet long. Thread a stop bead to prevent slipping while you work. Create Ladder Stitch Base: Use groupings of 8/0 – 11/0 – 8/0 seed beads. Repeat until you have 5 rows to form your base strip. Add First Fringe Drop: Thread beads in this pattern: 5 x 11/0, tublet, 11/0, 8/0, crystal drop, then 3 x 11/0 (picot trim). Skip the picot trim beads and go back up through the strand to secure. Build the Full Fringe: Next fringe strand: Use 7 beads, then tublet, 11/0, 8/0, drop, picot trim. Repeat and increase to 8 beads in the middle strand, then decrease: Pattern = 5 – 7 – 8 – 7 – 5 strands. Begin Brick Stitch: Turn work upward. Stitch rows of 3 x 11/0s per set onto bridge threads above the ladder stitch. Share the first and last threads to maintain the triangular shape. Add Additional Brick Rows: Alternate using 8/0s and 11/0s. Adjust the number of bead sets in each row based on the bridge thread count (e.g., 6, 5, 4 sets). Attach Wire Guard: At the top row, add 2 x 8/0s with 1 x 11/0 in between. Skip to the far bridge thread to form a triangle shape. Add wire guard with 11/0s on each side. Reinforce & Finish: Tie thread off using a bridge thread with a square knot. Reinforce the wire guard and final rows. Trim and burn ends for a clean finish. Add Earwire: Slide earwire onto the wire guard loop and close securely.

    Step 5: Need Any Extra Materials?

    • Potomacbeads Beading Ruler | Ultimate | Crystal | 9x3"
    • Thread Zap II
    • BeadTec Beading Needles Sizes 10, 11, 12 | Mix Pack of 6
    • Plastic Caliper Tool - White
    • BeadTec DragonThread - Crystal/White | Size 6 (Medium) | 50 Meter Spool
    • BeadTec DragonThread - Green | Size 6 (Medium) | 50 Meter Spool

    Step 5: Need Any Extra Materials?

    BeadTec Beading Ruler | Advanced | 6x3"
    Long Fringe Earrings with Multiple Bead Sizes Tutorial
    PotomacBeads Pliers - Round Nose Pliers

    Step 6: Choose Your Next Project

    • Learn how to create beautiful and artistic RounDuo Bangle Stacker Bracelets in this DIY jewelry-making tutorial. Using RounDuo or RounDuo Mini beads paired with 11/0, 15/0, and 8/0 seed beads, this video will guide you through each step, from selecting materials to finishing with a clasp or continuous bangle design.

      Read More

    Step 6: Choose Your Next Project

    • Glasgow Rose Embroidered Pendant - DIY Jewelry Making Tutorial by PotomacBeads
    • Glasgow Rose Embroidered Pendant - DIY Jewelry Making Tutorial by PotomacBeads

    Watch Anna Tonnesen as she provides detailed step by step tutorial instructions to learn to embroider with beads. Create the Glasgow Rose pendant or create your own masterpiece of DIY jewelry following this project tutorial. Learn how to lay out your embroidery project, cut and shape your surface, sew on beads, apply the backing and seem the sides of the piece.
    • Comet Earrings - DIY Jewelry Making Tutorial by PotomacBeads
    • Flower Gem Earrings - DIY Jewelry Making Tutorial by PotomacBeads
    • Embroidered Rings - DIY Jewelry Making Tutorial by PotomacBeads

    Join Our Growing Community

    Community profile photo 1
    Community profile photo 2
    Community profile photo 3
    Community profile photo 4

    Our Testimonials

    • 5
      6012 (83.8%)
    • 4
      814 (11.3%)
    • 3
      296 (4.1%)
    • 2
      30 (0.4%)
    • 1
      24 (0.3%)
    95% of customers rate this company 4- or 5-stars
    Newest to Oldest
    • Favorite Reviews
    • Highest to Lowest
    • Newest to Oldest
    All Ratings
    • All Ratings
    • 5 ★ Reviews
    • 4 ★ Reviews
    • 3 ★ Reviews
    • 2 ★ Reviews
    • 1 ★ Reviews
    Sandra S. Verified Customer
    05-11-25

    It was easy

    Tia W. Verified Customer
    05-11-25

    A

    Vicki H. Verified Customer
    05-11-25

    Thanks for your fast and efficient help.

    Mary H. Verified Customer
    05-10-25

    The only place I could find exactly what I need

    Carlene N. Verified Customer
    05-10-25

    Had what I was looking for!

    Marcia T. Verified Customer
    05-10-25

    Great!

    Amanda L. Verified Customer
    05-10-25

    Very easy to find what I was looking for. Good quality

    PAMELA N. Verified Customer
    05-10-25

    Always a pleasure, Allie, thank you for all your videos too!

    NLambert Verified Customer
    05-10-25

    Easy to use website.

    Bonnie S. Verified Customer
    05-10-25

    love buying from potomac beads :)

    Only Visible on Admin Mode

    Item Description

    Create the Long Fringe Earrings, a lightweight and eye-catching accessory combining multiple bead sizes and textured fringe. This tutorial covers essential techniques including ladder stitch, brick stitch, and fringe work, using DragonThread, 11/0 and 8/0 seed beads, tublet beads, and crystal drops. Learn how to layer fringe lengths, create balanced triangular forms, and adapt brick stitch tension across different bead sizes. Finish the piece with a wire guard and earwire attachment. These earrings are versatile, perfect for summer styles, and easily customized with various color schemes or bead shapes.

    Designer's Material List

    The designer's suggested colors & materials:
  • Potomac Crystal Teardrop Beads - Alexandrite AB 6x8mm, 10 Beads
  • Tubelet Beads - Jet Bronze, 10 Beads
  • Miyuki Seed Beads - Metallic Light Bronze 8/0, ~1 Gram
  • Azuki Seed Beads - Opaque Orchid Size 11/0, ~1 Gram
  • Athenacast Wire Guard Protectors - 4.5x4mm Premium Antique Brass Plated Stainless Steel, 2 Pieces
  • Athenacast Earwires Leverback - 18mm Premium Antique Copper Plated Brass, 2 Pieces
  • Project Steps

    Prepare Materials: Use size 6 DragonThread, about 4 feet long. Thread a stop bead to prevent slipping while you work. Create Ladder Stitch Base: Use groupings of 8/0 – 11/0 – 8/0 seed beads. Repeat until you have 5 rows to form your base strip. Add First Fringe Drop: Thread beads in this pattern: 5 x 11/0, tublet, 11/0, 8/0, crystal drop, then 3 x 11/0 (picot trim). Skip the picot trim beads and go back up through the strand to secure. Build the Full Fringe: Next fringe strand: Use 7 beads, then tublet, 11/0, 8/0, drop, picot trim. Repeat and increase to 8 beads in the middle strand, then decrease: Pattern = 5 – 7 – 8 – 7 – 5 strands. Begin Brick Stitch: Turn work upward. Stitch rows of 3 x 11/0s per set onto bridge threads above the ladder stitch. Share the first and last threads to maintain the triangular shape. Add Additional Brick Rows: Alternate using 8/0s and 11/0s. Adjust the number of bead sets in each row based on the bridge thread count (e.g., 6, 5, 4 sets). Attach Wire Guard: At the top row, add 2 x 8/0s with 1 x 11/0 in between. Skip to the far bridge thread to form a triangle shape. Add wire guard with 11/0s on each side. Reinforce & Finish: Tie thread off using a bridge thread with a square knot. Reinforce the wire guard and final rows. Trim and burn ends for a clean finish. Add Earwire: Slide earwire onto the wire guard loop and close securely.