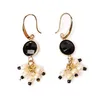
Learn how to create Classic Crystal Dangle Earrings with a timeless design. This project emphasizes techniques for working with headpins, jump rings, and pearls for elegant and versatile dangle earrings. Use 8mm pearls, 4mm pearls, bead caps, jump rings, headpins, and ear wires to craft these earrings. Master creating eye pins, linking pearls with bead caps, assembling dangles with jump rings, and attaching them to ear wires. Customize the design by experimenting with different pearl colors, bead caps, or crystal shapes for unique and personalized earring styles.
Gather Materials:
4mm and 8mm pearls. Bead caps to embellish the pearls. Jump rings for connecting components. Headpins for creating dangles. Ear wires to complete the earrings. Round-nose pliers and wire cutters for assembly.
Prepare the Dangles:
Thread a bead cap and a pearl onto a headpin. Use round-nose pliers to form a loop at the top of the headpin, securing the bead in place. Repeat for all pearls (four 4mm pearls and one 8mm pearl per earring).
Assemble the Dangles:
Attach the prepared pearl dangles to jump rings, creating cascading layers. Place the largest pearl (8mm) at the bottom as the focal point.
Attach to Ear Wires:
Open the top jump ring using two pliers and attach it to the ear wire. Close the jump ring securely.
Final Adjustments:
Ensure all loops and jump rings are tightly closed to prevent any components from slipping. Check the alignment and balance of the dangles for symmetry.
Learn how to create beautiful and artistic RounDuo Bangle Stacker Bracelets in this DIY jewelry-making tutorial. Using RounDuo or RounDuo Mini beads paired with 11/0, 15/0, and 8/0 seed beads, this video will guide you through each step, from selecting materials to finishing with a clasp or continuous bangle design.
Learn how to create beautiful and artistic RounDuo Bangle Stacker Bracelets in this DIY jewelry-making tutorial. Using RounDuo or RounDuo Mini beads paired with 11/0, 15/0, and 8/0 seed beads, this video will guide you through each step, from selecting materials to finishing with a clasp or continuous bangle design. Perfect for both beginners and advanced beaders, this project allows for endless creativity with color combinations. Shop the materials needed and follow along to create your own unique bracelet!
Glasgow Rose Embroidered Pendant - DIY Jewelry Making Tutorial by PotomacBeads
Glasgow Rose Embroidered Pendant - DIY Jewelry Making Tutorial by PotomacBeads
Watch Anna Tonnesen as she provides detailed step by step tutorial instructions to learn to embroider with beads. Create the Glasgow Rose pendant or create your own masterpiece of DIY jewelry following this project tutorial. Learn how to lay out your embroidery project, cut and shape your surface, sew on beads, apply the backing and seem the sides of the piece.
Comet Earrings - DIY Jewelry Making Tutorial by PotomacBeads
Flower Gem Earrings - DIY Jewelry Making Tutorial by PotomacBeads
Embroidered Rings - DIY Jewelry Making Tutorial by PotomacBeads
Just finishing a purchase set up earlier. Your website is very easy to navigate.
Share
April M.
04-09-25
Very easy to find what I needed
Share
Marianne B.
04-09-25
my shopping experience went very smoothly.
Share
Donna S.
04-09-25
Love the variety of different projects with the tutorials and associated shopping lists! Great selection of beads!!
Share
Mary S.
04-09-25
Love these beads
Share
Charlene F.
04-09-25
easy to find what I was looking for.
Share
Sherry M.
04-09-25
Quick and easy.
Share
Dena H.
04-09-25
You guys are great! You usually have what I need! You get my order to me in a timely fashion!! Thank you!
Share
Laura W.
04-09-25
Love your beads and findings
Share
Loading...
Only Visible on Admin Mode
Item Description
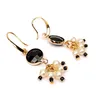
Learn how to create Classic Crystal Dangle Earrings with a timeless design. This project emphasizes techniques for working with headpins, jump rings, and pearls for elegant and versatile dangle earrings. Use 8mm pearls, 4mm pearls, bead caps, jump rings, headpins, and ear wires to craft these earrings. Master creating eye pins, linking pearls with bead caps, assembling dangles with jump rings, and attaching them to ear wires. Customize the design by experimenting with different pearl colors, bead caps, or crystal shapes for unique and personalized earring styles.
Gather Materials:
4mm and 8mm pearls. Bead caps to embellish the pearls. Jump rings for connecting components. Headpins for creating dangles. Ear wires to complete the earrings. Round-nose pliers and wire cutters for assembly.
Prepare the Dangles:
Thread a bead cap and a pearl onto a headpin. Use round-nose pliers to form a loop at the top of the headpin, securing the bead in place. Repeat for all pearls (four 4mm pearls and one 8mm pearl per earring).
Assemble the Dangles:
Attach the prepared pearl dangles to jump rings, creating cascading layers. Place the largest pearl (8mm) at the bottom as the focal point.
Attach to Ear Wires:
Open the top jump ring using two pliers and attach it to the ear wire. Close the jump ring securely.
Final Adjustments:
Ensure all loops and jump rings are tightly closed to prevent any components from slipping. Check the alignment and balance of the dangles for symmetry.
Bullet 1
Bullet 2
Bullet 3
You must be logged in to access the wishlist feature.