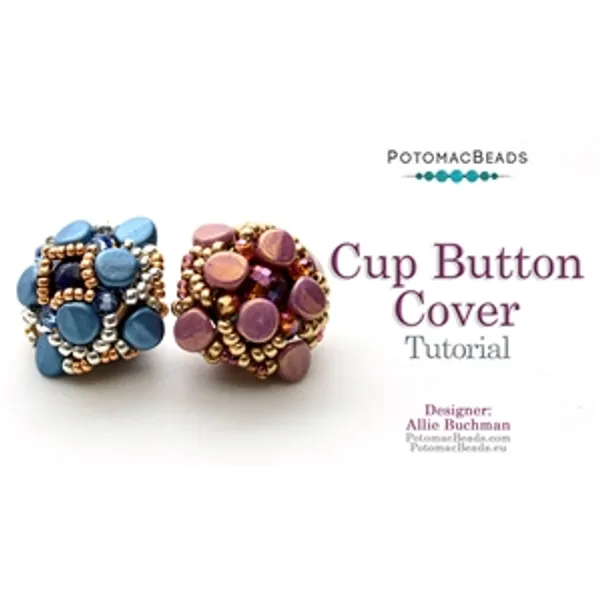
Looking for something to do with all those Cup Buttons lying around? Allie created a beautiful beaded cover using Ilos Beads, a 6mm Gemstone, Miyuki Seed Beads 15/0 and 11/0, and Potomac Crystal Rondelles 1.5x2mm. Make earrings or use them as buttons for your favorite cardigan. There are so many possibilities! Gather your materials and get started!
Prepare Materials: Gather all the beads and materials listed. Start Netting: Begin by creating a base netting with Ilos Beads and Potomac Crystal Rondelles. Add Seed Beads: Integrate Miyuki Seed Beads 11/0 and 15/0 into the netting to form the cover's outer layer. Insert Gemstone: Place a 6mm Gemstone in the center of the Cup Button cover for an elegant touch. Finalize Cover: Complete the netting process, ensuring the cover fits snugly over the Cup Button. Customize & Use: Attach a wire guard for use as a button or incorporate into jewelry as desired.
Learn how to create beautiful and artistic RounDuo Bangle Stacker Bracelets in this DIY jewelry-making tutorial. Using RounDuo or RounDuo Mini beads paired with 11/0, 15/0, and 8/0 seed beads, this video will guide you through each step, from selecting materials to finishing with a clasp or continuous bangle design.
Learn how to create beautiful and artistic RounDuo Bangle Stacker Bracelets in this DIY jewelry-making tutorial. Using RounDuo or RounDuo Mini beads paired with 11/0, 15/0, and 8/0 seed beads, this video will guide you through each step, from selecting materials to finishing with a clasp or continuous bangle design. Perfect for both beginners and advanced beaders, this project allows for endless creativity with color combinations. Shop the materials needed and follow along to create your own unique bracelet!
Glasgow Rose Embroidered Pendant - DIY Jewelry Making Tutorial by PotomacBeads
Glasgow Rose Embroidered Pendant - DIY Jewelry Making Tutorial by PotomacBeads
Watch Anna Tonnesen as she provides detailed step by step tutorial instructions to learn to embroider with beads. Create the Glasgow Rose pendant or create your own masterpiece of DIY jewelry following this project tutorial. Learn how to lay out your embroidery project, cut and shape your surface, sew on beads, apply the backing and seem the sides of the piece.
Comet Earrings - DIY Jewelry Making Tutorial by PotomacBeads
Flower Gem Earrings - DIY Jewelry Making Tutorial by PotomacBeads
Embroidered Rings - DIY Jewelry Making Tutorial by PotomacBeads
The website had a bunch of hiccups. I tried to checkout 4 times before it finally worked correctly. I also don't appreciate having expensive items pushed at me when I'm trying to check out.
Share
Jeanie M.
04-02-25
You have some beautiful beads.I love most but I had to stick to my budget.
Share
Lisa W.
04-02-25
Great selection of products and cannot wait to get my first treasure box!
Share
Kathy B.
04-02-25
Excellent quality and easy to order on the site.
Share
Demetra G.
04-02-25
Sorry I was ordering so late the sale beads I wanted were out of stock! Maybe I won’t have the grandkids during the next sale.
Share
L A.
04-02-25
AS usual see ALL sorts of items, sticking to a macrame idea but whomever posted the video removed it so I get to wing it!
Share
Julia H.
04-01-25
Even though you're charge for shipping is higher than most, you have a great selection of items, including ones which are harder to find. I'm very grateful for that!
Share
Audrey W.
04-01-25
All good, just confused on discount codes. I hope I recthe discounts, hard to tell. Thank you
Share
Karen C.
04-01-25
Love
Share
Loading...
Only Visible on Admin Mode
Item Description
Looking for something to do with all those Cup Buttons lying around? Allie created a beautiful beaded cover using Ilos Beads, a 6mm Gemstone, Miyuki Seed Beads 15/0 and 11/0, and Potomac Crystal Rondelles 1.5x2mm. Make earrings or use them as buttons for your favorite cardigan. There are so many possibilities! Gather your materials and get started!
Prepare Materials: Gather all the beads and materials listed. Start Netting: Begin by creating a base netting with Ilos Beads and Potomac Crystal Rondelles. Add Seed Beads: Integrate Miyuki Seed Beads 11/0 and 15/0 into the netting to form the cover's outer layer. Insert Gemstone: Place a 6mm Gemstone in the center of the Cup Button cover for an elegant touch. Finalize Cover: Complete the netting process, ensuring the cover fits snugly over the Cup Button. Customize & Use: Attach a wire guard for use as a button or incorporate into jewelry as desired.
Bullet 1
Bullet 2
Bullet 3
You must be logged in to access the wishlist feature.