Beaded Open Micro Macrame Bracelet/Anklet Tutorial
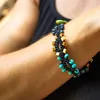
Learn how to make a beautiful Beaded Open Micro Macrame Bracelet/Anklet with this DIY jewelry-making tutorial by PotomacBeads. In this video, you'll discover the artistic techniques of micro macrame, using BeadTec knotting cord, Miyuki seed beads, and table cut buttons. Perfect for summer accessories or elegant jewelry pieces, this step-by-step guide will help you create stunning bracelets, anklets, or necklaces. Gather your materials and join us in this creative beading adventure!
Table Cut Buttons - Opaque Blue Turquoise Travertine, 1 Piece
Step 3: Need More Help? Follow these Steps
Quick Project Steps
Gather Materials: Collect BeadTec knotting cord, Miyuki seed beads, table cut buttons, scissors, and a lighter.
Cut the Cord: Cut six pieces of cord, each about 32 inches long.
Create the Base Loop: Tie the cords together in a loop big enough for the button to pass through.
Start Knotting: Secure the cords and begin knotting using the alternating square knot technique, known as "Snoopy's nose."
Add Beads: After a few knots, add a bead to the right cord and continue knotting, alternating sides.
Separate and Continue: Split the cords into two groups of three and continue knotting, adding beads to each side.
Rejoin Cords: Bring the cords back together and continue the pattern, ensuring consistency.
Finish the Ends: Secure the button, tie off the ends, and use a lighter to burn and secure the knots.
Final Adjustments: Adjust the knots and beads for uniformity and trim any excess cord.
Create a double or tripple leather wrap with an extra flair. Use seed beads to create a delicate border to showcase a mosaic of gemstones, crystals and glass. This wrap is comfortable to wear and makes a great piece to take (or make) on a summer vacation destination.
Create a double or tripple leather wrap with an extra flair. Use seed beads to create a delicate border to showcase a mosaic of gemstones, crystals and glass. This wrap is comfortable to wear and makes a great piece to take (or make) on a summer vacation destination.
Glasgow Rose Embroidered Pendant - DIY Jewelry Making Tutorial by PotomacBeads
Glasgow Rose Embroidered Pendant - DIY Jewelry Making Tutorial by PotomacBeads
Watch Anna Tonnesen as she provides detailed step by step tutorial instructions to learn to embroider with beads. Create the Glasgow Rose pendant or create your own masterpiece of DIY jewelry following this project tutorial. Learn how to lay out your embroidery project, cut and shape your surface, sew on beads, apply the backing and seem the sides of the piece.
Comet Earrings - DIY Jewelry Making Tutorial by PotomacBeads
Flower Gem Earrings - DIY Jewelry Making Tutorial by PotomacBeads
Embroidered Rings - DIY Jewelry Making Tutorial by PotomacBeads
Very easy to find what I was looking for. Good quality
Share
PAMELA N.
05-10-25
Always a pleasure, Allie, thank you for all your videos too!
Share
NLambert
05-10-25
Easy to use website.
Share
Bonnie S.
05-10-25
love buying from potomac beads :)
Share
Loading...
Only Visible on Admin Mode
Item Description
Learn how to make a beautiful Beaded Open Micro Macrame Bracelet/Anklet with this DIY jewelry-making tutorial by PotomacBeads. In this video, you'll discover the artistic techniques of micro macrame, using BeadTec knotting cord, Miyuki seed beads, and table cut buttons. Perfect for summer accessories or elegant jewelry pieces, this step-by-step guide will help you create stunning bracelets, anklets, or necklaces. Gather your materials and join us in this creative beading adventure!
Table Cut Buttons - Opaque Blue Turquoise Travertine, 1 Piece
Project Steps
Gather Materials: Collect BeadTec knotting cord, Miyuki seed beads, table cut buttons, scissors, and a lighter.
Cut the Cord: Cut six pieces of cord, each about 32 inches long.
Create the Base Loop: Tie the cords together in a loop big enough for the button to pass through.
Start Knotting: Secure the cords and begin knotting using the alternating square knot technique, known as "Snoopy's nose."
Add Beads: After a few knots, add a bead to the right cord and continue knotting, alternating sides.
Separate and Continue: Split the cords into two groups of three and continue knotting, adding beads to each side.
Rejoin Cords: Bring the cords back together and continue the pattern, ensuring consistency.
Finish the Ends: Secure the button, tie off the ends, and use a lighter to burn and secure the knots.
Final Adjustments: Adjust the knots and beads for uniformity and trim any excess cord.
Bullet 1
Bullet 2
Bullet 3
You must be logged in to access the wishlist feature.