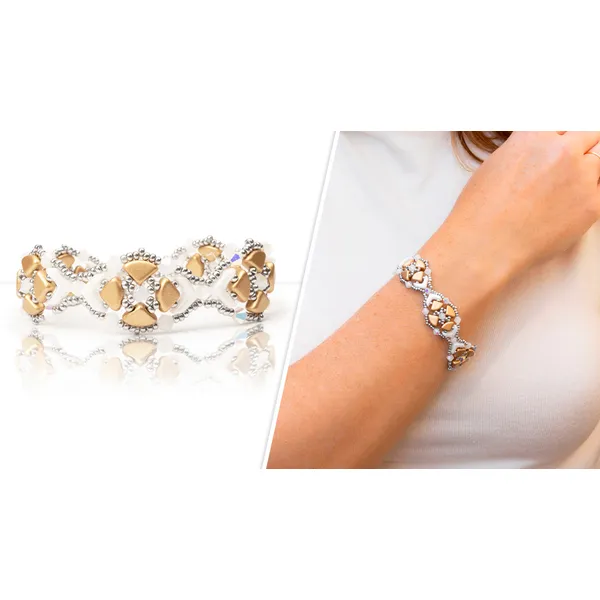
Create the Wedding Cake Bracelet, a layered and elegant design using Eva beads, PieDuo beads, Miyuki 11/0 seed beads, and 4mm bicone crystals. The tutorial teaches how to form individual geometric units that can be linked together to make a full bracelet, or used individually as earrings or necklace components. You'll work with DragonThread and create structured connections with alternating PieDuo orientations, adding sparkle with bicone centers and accent details. Finish the bracelet with a secure clasp and reinforced loop for durability. This piece blends metallics and crystals for a polished, bridal-inspired look, perfect for any occasion.
Miyuki Seed Beads - Silver Labrador Full 11/0, ~2 Grams
Potomac Crystal Bicone Beads - White AB 4mm, 31 Beads
Cup Buttons - Crystal Labrador, 1 Piece
Step 3: Need More Help? Follow these Steps
Quick Project Steps
Start with Stop Bead: Thread your needle with DragonThread and add a stop bead to anchor your start.
Create Base Unit:
Add: 3 x 11/0 seed beads, go down through Eva bead (V-side to open side). Add 1 x 11/0, then a Pi Duo (hole facing Eva). Add 2 x 11/0, then another Pi Duo in opposite direction (facing outward). Add 3 x 11/0 and go back through the first Pi Duo to complete the arc.
Mirror the Structure: Add 2 x 11/0, one more Pi Duo, and 1 x 11/0, then finish the loop with an Eva bead.
Add Center Crystal:
Exit from the inner seed beads and add: 11/0 – 4mm bicone – 11/0. Cross to the opposite side and go through the matching seed bead to lock the crystal.
Join Next Unit:
Exit through the edge, repeat the full unit steps, but this time share the 4mm crystal between units to link them.
Add Outer Arches:
Along the edge Pi Duos, add: 3 x 11/0 – 4mm bicone – 2 x 11/0, skip the middle bead to form a pointed arch.
Repeat to Desired Length:
Continue building and connecting new units until the bracelet fits your wrist.
Attach Cup Button Clasp:
Add 3 x 11/0s, pass through the cup button, add 3 more 11/0s, then go back through the last bicone and reinforce.
Create the Loop:
On the opposite end, add 3 x 11/0s + 28 x 11/0s, form a loop, and reinforce with a V-formation for security.
Secure and Finish:
Use a bridge thread to tie a knot, weave the thread in, and burn off the excess for a clean finish.
Learn how to create beautiful and artistic RounDuo Bangle Stacker Bracelets in this DIY jewelry-making tutorial. Using RounDuo or RounDuo Mini beads paired with 11/0, 15/0, and 8/0 seed beads, this video will guide you through each step, from selecting materials to finishing with a clasp or continuous bangle design.
Learn how to create beautiful and artistic RounDuo Bangle Stacker Bracelets in this DIY jewelry-making tutorial. Using RounDuo or RounDuo Mini beads paired with 11/0, 15/0, and 8/0 seed beads, this video will guide you through each step, from selecting materials to finishing with a clasp or continuous bangle design. Perfect for both beginners and advanced beaders, this project allows for endless creativity with color combinations. Shop the materials needed and follow along to create your own unique bracelet!
Glasgow Rose Embroidered Pendant - DIY Jewelry Making Tutorial by PotomacBeads
Glasgow Rose Embroidered Pendant - DIY Jewelry Making Tutorial by PotomacBeads
Watch Anna Tonnesen as she provides detailed step by step tutorial instructions to learn to embroider with beads. Create the Glasgow Rose pendant or create your own masterpiece of DIY jewelry following this project tutorial. Learn how to lay out your embroidery project, cut and shape your surface, sew on beads, apply the backing and seem the sides of the piece.
Comet Earrings - DIY Jewelry Making Tutorial by PotomacBeads
Flower Gem Earrings - DIY Jewelry Making Tutorial by PotomacBeads
Embroidered Rings - DIY Jewelry Making Tutorial by PotomacBeads
Great product, fast turnaround. Had 1 of the Rivoli come in damaged and no problem getting a new one sent out.
Share
Staci S.
04-23-25
It was quick service and nice quality
Share
A Reviewer
04-23-25
Good
Share
Alicia M.
04-23-25
Your system is really working, which is great
Share
Julia H.
04-23-25
Enjoy that Potomac has such an amazing variety of... Everything!
Share
Marcia L.
04-23-25
Fairly easy
Share
Christina V.
04-22-25
I usually find the beads I need. The selection on Delicas is realy good. I usually get quick shipping.
Share
Norma I.
04-22-25
Todo muy bien, como siempre.
Share
Michelle L.
04-22-25
I like the express shipping!!
Share
Mary L.
04-22-25
Good
Share
Loading...
Only Visible on Admin Mode
Item Description
Create the Wedding Cake Bracelet, a layered and elegant design using Eva beads, PieDuo beads, Miyuki 11/0 seed beads, and 4mm bicone crystals. The tutorial teaches how to form individual geometric units that can be linked together to make a full bracelet, or used individually as earrings or necklace components. You'll work with DragonThread and create structured connections with alternating PieDuo orientations, adding sparkle with bicone centers and accent details. Finish the bracelet with a secure clasp and reinforced loop for durability. This piece blends metallics and crystals for a polished, bridal-inspired look, perfect for any occasion.
Designer's Material List
The designer's suggested colors & materials:
EVA Beads - White Shimmer, 10 Beads
PieDuo Beads - Aztec Gold, 20 Beads
Miyuki Seed Beads - Silver Labrador Full 11/0, ~2 Grams
Potomac Crystal Bicone Beads - White AB 4mm, 31 Beads
Cup Buttons - Crystal Labrador, 1 Piece
Project Steps
Start with Stop Bead: Thread your needle with DragonThread and add a stop bead to anchor your start.
Create Base Unit:
Add: 3 x 11/0 seed beads, go down through Eva bead (V-side to open side). Add 1 x 11/0, then a Pi Duo (hole facing Eva). Add 2 x 11/0, then another Pi Duo in opposite direction (facing outward). Add 3 x 11/0 and go back through the first Pi Duo to complete the arc.
Mirror the Structure: Add 2 x 11/0, one more Pi Duo, and 1 x 11/0, then finish the loop with an Eva bead.
Add Center Crystal:
Exit from the inner seed beads and add: 11/0 – 4mm bicone – 11/0. Cross to the opposite side and go through the matching seed bead to lock the crystal.
Join Next Unit:
Exit through the edge, repeat the full unit steps, but this time share the 4mm crystal between units to link them.
Add Outer Arches:
Along the edge Pi Duos, add: 3 x 11/0 – 4mm bicone – 2 x 11/0, skip the middle bead to form a pointed arch.
Repeat to Desired Length:
Continue building and connecting new units until the bracelet fits your wrist.
Attach Cup Button Clasp:
Add 3 x 11/0s, pass through the cup button, add 3 more 11/0s, then go back through the last bicone and reinforce.
Create the Loop:
On the opposite end, add 3 x 11/0s + 28 x 11/0s, form a loop, and reinforce with a V-formation for security.
Secure and Finish:
Use a bridge thread to tie a knot, weave the thread in, and burn off the excess for a clean finish.
Bullet 1
Bullet 2
Bullet 3
You must be logged in to access the wishlist feature.