• Jewelry-Making Supplies
  • Kits & Collections
  • Subscriptions
  • Learn to Make
  • Discounts & Deals

Timeless Grace Bracelet Tutorial

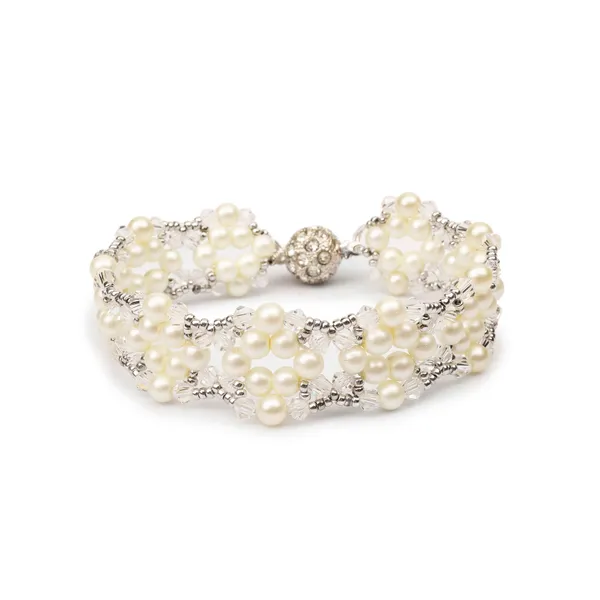
Learn how to create an elegant pearl bracelet using 15/0 seed beads, 4mm pearls, and 3mm crystals in a structured right-angle weave pattern. The project begins with a base loop of six 4mm beads reinforced for stability, followed by adding 15/0 seed beads between 3mm bicones to achieve a subtle diamond effect. Using Dragon Thread (size six), a size 10 needle, and a stop bead, the design is extended by repeating the process of adding pearls, bicones, and seed beads. The clasp is secured with a wire guard and reinforced for durability. For a wider and more decorative bracelet, additional beads can be added along the sides, with final adjustments to tension and reinforcement ensuring a polished, sturdy finish.

Step 1: Choose Your Materials

Step 2: Watch the 
Video Tutorial

Timeless Grace Bracelet Tutorial
The designer's suggested colors & materials:
  • Potomac Pearls - Pale White Satin 4mm, 80 Pearls
  • Potomac Crystal Bicone Beads - Crystal 3mm, 76 Beads
  • Miyuki Seed Beads - Silver Labrador Full 15/0, ~1 Gram
  • Claspgarten Crystal Ball Box Push Clasp | 10mm | 1-Strand | Real Platinum Plated, 1 Piece
  • Step 3: Need More Help? Follow these Steps

    steps

    Quick Project Steps

    Prepare the Thread & Stop Bead: Cut a comfortable length of Dragon thread. Add a stop bead to prevent beads from sliding off. Create the Base Loop: String six 4mm pearls, forming a circular shape. Reinforce by threading through the pearls again to secure. Begin the Right-Angle Weave: Pick up one 3mm crystal, one 15/0 seed bead, one 3mm crystal, then go through the next pearl in the loop. Repeat this pattern all around. Extend the Bracelet: Continue adding pearls, bicones, and seed beads in the same pattern to achieve the desired length. Attach the Clasp: Secure a wire guard at one end and loop the clasp through. Reinforce by weaving through multiple times. Final Reinforcement & Finishing Touches: Go back through the bracelet, tightening the weave for durability. Add decorative beads to the sides if desired. Tie off and weave in the thread ends neatly.

    Step 5: Need Any Extra Materials?

    • Potomacbeads Beading Ruler | Ultimate | Crystal | 9x3"
    • Thread Zap II
    • BeadTec Beading Needles Sizes 10, 11, 12 | Mix Pack of 6
    • Plastic Caliper Tool - White
    • BeadTec DragonThread - Crystal/White | Size 6 (Medium) | 50 Meter Spool
    • BeadTec DragonThread - Green | Size 6 (Medium) | 50 Meter Spool

    Step 5: Need Any Extra Materials?

    BeadTec Beading Ruler | Advanced | 6x3"
    Timeless Grace Bracelet Tutorial
    PotomacBeads Pliers - Round Nose Pliers

    Step 6: Choose Your Next Project

    • Learn how to create beautiful and artistic RounDuo Bangle Stacker Bracelets in this DIY jewelry-making tutorial. Using RounDuo or RounDuo Mini beads paired with 11/0, 15/0, and 8/0 seed beads, this video will guide you through each step, from selecting materials to finishing with a clasp or continuous bangle design.

      Read More

    Step 6: Choose Your Next Project

    • Glasgow Rose Embroidered Pendant - DIY Jewelry Making Tutorial by PotomacBeads
    • Glasgow Rose Embroidered Pendant - DIY Jewelry Making Tutorial by PotomacBeads

    Watch Anna Tonnesen as she provides detailed step by step tutorial instructions to learn to embroider with beads. Create the Glasgow Rose pendant or create your own masterpiece of DIY jewelry following this project tutorial. Learn how to lay out your embroidery project, cut and shape your surface, sew on beads, apply the backing and seem the sides of the piece.
    • Comet Earrings - DIY Jewelry Making Tutorial by PotomacBeads
    • Flower Gem Earrings - DIY Jewelry Making Tutorial by PotomacBeads
    • Embroidered Rings - DIY Jewelry Making Tutorial by PotomacBeads

    Join Our Growing Community

    Community profile photo 1
    Community profile photo 2
    Community profile photo 3
    Community profile photo 4

    Our Testimonials

    • 5
      5667 (83.7%)
    • 4
      765 (11.3%)
    • 3
      282 (4.2%)
    • 2
      28 (0.4%)
    • 1
      25 (0.4%)
    95% of customers rate this company 4- or 5-stars
    Newest to Oldest
    • Favorite Reviews
    • Highest to Lowest
    • Newest to Oldest
    All Ratings
    • All Ratings
    • 5 ★ Reviews
    • 4 ★ Reviews
    • 3 ★ Reviews
    • 2 ★ Reviews
    • 1 ★ Reviews
    Ben Verified Customer
    04-06-25

    It's basically fine. A little annoying that the cart items don't link back to the full item description, but this is a nit pick. Company seems all right.

    Debbie G. Verified Customer
    04-06-25

    For some reason the drop down menus don't work. Hover the mouse cursor over it, then try to click on something under it and nothing happens. I would have bought more if I could have looked around.

    Wanda L. Verified Customer
    04-06-25

    Great selection. Found some things that I have not been able to find at other shops.

    Patricia M. Verified Customer
    04-06-25

    order form was difficult as it wasn't clear to me if the jewelry pattern was going to be shipped to me, or provide a website to retrieve a pdf of the pattern also: I didn't have my password, so requested to make a new one, and again, directions were not clear, tho I followed what it said, and it did not provide an oppty to create new password, just took me back to my order page!

    Kaye B. Verified Customer
    04-06-25

    I'm buying patterns because of the 50% mix and match sale, but the 50% off did not show up. So, it looks like I'm paying full price. I'm glad I was able to use rewards points, but nonetheless it's upsetting.

    Lene T. Verified Customer
    04-06-25

    Good site. Good product. But the purchase today did not apply discount. Frustrating.

    Kathleen T. Verified Customer
    04-06-25

    Found patterns that I would like to do

    Catherine D. Verified Customer
    04-06-25

    Very informative. I would like to know the stitches used to make each kit. Beautiful kits make it difficult to decide which to purchase.

    Jana H. Verified Customer
    04-06-25

    The pearls were all nice except the cranberry color. I would not recommend them.

    Norma B. Verified Customer
    04-06-25

    I love buying from Potomac, shopping is easy and the order arrives in a timely fashion. This was my first time buying kits, I love that I have extra beads now to add to my stash! I will be looking for more sales on kits to purchase again! Thank you for all you do to make my beading addiction more fun!

    Only Visible on Admin Mode

    Item Description

    Learn how to create an elegant pearl bracelet using 15/0 seed beads, 4mm pearls, and 3mm crystals in a structured right-angle weave pattern. The project begins with a base loop of six 4mm beads reinforced for stability, followed by adding 15/0 seed beads between 3mm bicones to achieve a subtle diamond effect. Using Dragon Thread (size six), a size 10 needle, and a stop bead, the design is extended by repeating the process of adding pearls, bicones, and seed beads. The clasp is secured with a wire guard and reinforced for durability. For a wider and more decorative bracelet, additional beads can be added along the sides, with final adjustments to tension and reinforcement ensuring a polished, sturdy finish.

    Designer's Material List

    The designer's suggested colors & materials:
  • Potomac Pearls - Pale White Satin 4mm, 80 Pearls
  • Potomac Crystal Bicone Beads - Crystal 3mm, 76 Beads
  • Miyuki Seed Beads - Silver Labrador Full 15/0, ~1 Gram
  • Claspgarten Crystal Ball Box Push Clasp | 10mm | 1-Strand | Real Platinum Plated, 1 Piece
  • Project Steps

    Prepare the Thread & Stop Bead: Cut a comfortable length of Dragon thread. Add a stop bead to prevent beads from sliding off. Create the Base Loop: String six 4mm pearls, forming a circular shape. Reinforce by threading through the pearls again to secure. Begin the Right-Angle Weave: Pick up one 3mm crystal, one 15/0 seed bead, one 3mm crystal, then go through the next pearl in the loop. Repeat this pattern all around. Extend the Bracelet: Continue adding pearls, bicones, and seed beads in the same pattern to achieve the desired length. Attach the Clasp: Secure a wire guard at one end and loop the clasp through. Reinforce by weaving through multiple times. Final Reinforcement & Finishing Touches: Go back through the bracelet, tightening the weave for durability. Add decorative beads to the sides if desired. Tie off and weave in the thread ends neatly.