• Jewelry-Making Supplies
  • Kits & Collections
  • Subscriptions
  • Learn to Make
  • Discounts & Deals

RounDuo Mini Ring Band Tutorial

  • Picture of Accessories, Jewelry, Ring, Bracelet, Ornament
  • Picture of Accessories, Jewelry, Ornament, Bracelet
  • Picture of Accessories, Jewelry, Bracelet, Ornament
  • Picture of Finger, Hand, Person, Accessories, Bracelet, Jewelry, Nail, Ring
  • Picture of Finger, Hand, Person, Accessories, Jewelry, Ring
  • Picture of Body Part, Finger, Hand, Person, Accessories, Jewelry, Ring
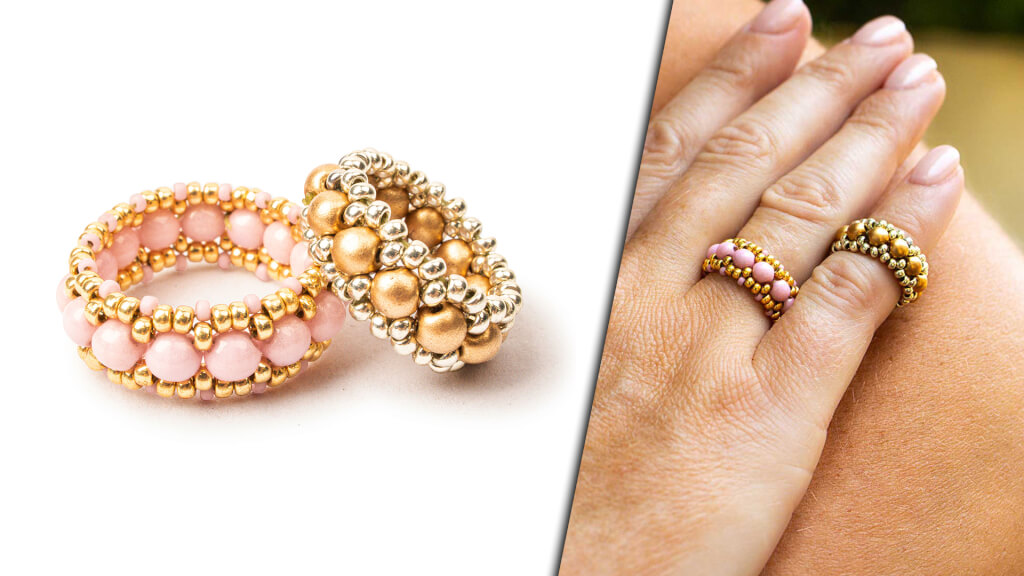
Learn how to create a stunning RounDuo Mini Ring Band with this DIY jewelry-making tutorial by PotomacBeads. This video provides a step-by-step guide using RounDuo Mini Beads and Miyuki Seed Beads in various sizes (11/0 and 15/0) to create an elegant and artistic ring. Perfect for both beginners and experienced beaders, this tutorial will help you craft a beautiful piece of jewelry with ease. Gather your materials and follow along to make your own unique ring.

Step 1: Choose Your Materials

Step 2: Watch the 
Video Tutorial

RounDuo Mini Ring Band Tutorial
The designer's suggested colors & materials:
  • RounDuo Mini Beads - White Lila Luster 4mm, 20 Beads
  • Miyuki Seed Beads - Duracoat Galvanized Champagne 11/0, ~1 Gram
  • Miyuki Seed Beads - Matte Opaque Dusty Orchid 15/0, 1 Gram
  • BeadTec DragonThread - Crystal/White | Size 8 (Thick), ~36 inches
  • Step 3: Need More Help? Follow these Steps

    steps

    Quick Project Steps

    Gather Materials: Collect all the necessary materials including RounDuo Mini Beads, Miyuki Seed Beads (11/0 and 15/0), and BeadTec DragonThread. Start the Band: Thread your needle with the BeadTec DragonThread. Add a stop bead and string one 11/0 seed bead followed by a RounDuo Mini through its first hole. Repeat until you reach the desired length for your ring size. Form the Loop: Check the fit by wrapping the beaded string around your finger. Adjust as necessary. Once satisfied, connect the ends to form a loop. Second Row: Go through the second hole of the RounDuo Mini and add another 11/0 seed bead between each bead, forming a complete second row. Reinforce the Band: Add two 11/0 seed beads between each bead on the exterior row. Flip to the opposite side and repeat the process to ensure the band is secure and tight. Add Finishing Touches: To add extra detail, string one 15/0 seed bead between each 11/0 seed bead on the outer rows. This will give the ring a polished and finished look. Secure the Thread: Once all beads are in place, tie off the thread securely by weaving it back through the beads. Use a thread burner to remove any excess thread.

    Step 5: Need Any Extra Materials?

    • Potomacbeads Beading Ruler | Ultimate | Crystal | 9x3"
    • Thread Zap II
    • BeadTec Beading Needles Sizes 10, 11, 12 | Mix Pack of 6
    • Plastic Caliper Tool - White
    • BeadTec DragonThread - Crystal/White | Size 6 (Medium) | 50 Meter Spool
    • BeadTec DragonThread - Green | Size 6 (Medium) | 50 Meter Spool

    Step 5: Need Any Extra Materials?

    BeadTec Beading Ruler | Advanced | 6x3"
    RounDuo Mini Ring Band Tutorial
    PotomacBeads Pliers - Round Nose Pliers

    Step 6: Choose Your Next Project

    • Learn how to create beautiful and artistic RounDuo Bangle Stacker Bracelets in this DIY jewelry-making tutorial. Using RounDuo or RounDuo Mini beads paired with 11/0, 15/0, and 8/0 seed beads, this video will guide you through each step, from selecting materials to finishing with a clasp or continuous bangle design.

      Read More

    Step 6: Choose Your Next Project

    • Glasgow Rose Embroidered Pendant - DIY Jewelry Making Tutorial by PotomacBeads
    • Glasgow Rose Embroidered Pendant - DIY Jewelry Making Tutorial by PotomacBeads

    Watch Anna Tonnesen as she provides detailed step by step tutorial instructions to learn to embroider with beads. Create the Glasgow Rose pendant or create your own masterpiece of DIY jewelry following this project tutorial. Learn how to lay out your embroidery project, cut and shape your surface, sew on beads, apply the backing and seem the sides of the piece.
    • Comet Earrings - DIY Jewelry Making Tutorial by PotomacBeads
    • Flower Gem Earrings - DIY Jewelry Making Tutorial by PotomacBeads
    • Embroidered Rings - DIY Jewelry Making Tutorial by PotomacBeads

    Join Our Growing Community

    Community profile photo 1
    Community profile photo 2
    Community profile photo 3
    Community profile photo 4

    Our Testimonials

    • 5
      5505 (83.6%)
    • 4
      752 (11.4%)
    • 3
      268 (4.1%)
    • 2
      31 (0.5%)
    • 1
      25 (0.4%)
    95% of customers rate this company 4- or 5-stars
    Newest to Oldest
    • Favorite Reviews
    • Highest to Lowest
    • Newest to Oldest
    All Ratings
    • All Ratings
    • 5 ★ Reviews
    • 4 ★ Reviews
    • 3 ★ Reviews
    • 2 ★ Reviews
    • 1 ★ Reviews
    Veronica J. Verified Customer
    03-27-25

    love the variety

    Sue B. Verified Customer
    03-27-25

    I had a hard time navigating your web site. Took too long to find everything I was looking for. When I go into the search bar I expect to have that item come up. Specifically I was looking for miniduo beads. This is the first time I've ordered from you. We'll see how it goes.

    Dorothy M. Verified Customer
    03-27-25

    Some unique beads here. I will be back.

    Mary B. Verified Customer
    03-27-25

    The various beads to choose from are phenomenal!

    Lorie R. Verified Customer
    03-27-25

    I can easily find what I am looking for, and the quality is always great!

    Jacqueline M. Verified Customer
    03-26-25

    Fine

    Cindy F. Verified Customer
    03-26-25

    THANK YOU SO MUCH!

    Rosanne E. Verified Customer
    03-26-25

    the beads are just what I ordered. The colors were what I expected

    Patricia E. Verified Customer
    03-26-25

    I love Potomac Beads. I have ordered from them for years. They are a great company to deal with, and if there's an issue, they have great customer service. I highly recommend them. I also recommend their Kit Box and Treasure Box subscriptions!!

    Janet B. Verified Customer
    03-26-25

    Have always wanted to try one of these. Thank you for the sale.

    Only Visible on Admin Mode

    Item Description

    Learn how to create a stunning RounDuo Mini Ring Band with this DIY jewelry-making tutorial by PotomacBeads. This video provides a step-by-step guide using RounDuo Mini Beads and Miyuki Seed Beads in various sizes (11/0 and 15/0) to create an elegant and artistic ring. Perfect for both beginners and experienced beaders, this tutorial will help you craft a beautiful piece of jewelry with ease. Gather your materials and follow along to make your own unique ring.

    Designer's Material List

    The designer's suggested colors & materials:
  • RounDuo Mini Beads - White Lila Luster 4mm, 20 Beads
  • Miyuki Seed Beads - Duracoat Galvanized Champagne 11/0, ~1 Gram
  • Miyuki Seed Beads - Matte Opaque Dusty Orchid 15/0, 1 Gram
  • BeadTec DragonThread - Crystal/White | Size 8 (Thick), ~36 inches
  • Project Steps

    Gather Materials: Collect all the necessary materials including RounDuo Mini Beads, Miyuki Seed Beads (11/0 and 15/0), and BeadTec DragonThread. Start the Band: Thread your needle with the BeadTec DragonThread. Add a stop bead and string one 11/0 seed bead followed by a RounDuo Mini through its first hole. Repeat until you reach the desired length for your ring size. Form the Loop: Check the fit by wrapping the beaded string around your finger. Adjust as necessary. Once satisfied, connect the ends to form a loop. Second Row: Go through the second hole of the RounDuo Mini and add another 11/0 seed bead between each bead, forming a complete second row. Reinforce the Band: Add two 11/0 seed beads between each bead on the exterior row. Flip to the opposite side and repeat the process to ensure the band is secure and tight. Add Finishing Touches: To add extra detail, string one 15/0 seed bead between each 11/0 seed bead on the outer rows. This will give the ring a polished and finished look. Secure the Thread: Once all beads are in place, tie off the thread securely by weaving it back through the beads. Use a thread burner to remove any excess thread.