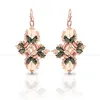
Learn to create beautiful floral-inspired earrings with a unique layered design, ideal for special occasions or as personalized gifts. Use Tublet beads, StormDuo beads in two colors, 11/0 seed beads, Dragon Thread, and wire guards to craft this intricate project. Master beadweaving techniques like arranging StormDuos into floral shapes, creating diamond patterns, and securing the design with wire guards and ear hooks. Experiment with different bead colors, sizes, and patterns to adapt the earrings for various styles or occasions.
BeadTec DragonThread - Green | Size 8 (Thick) | 50 Meter Spool, ~4 Feet
Step 3: Need More Help? Follow these Steps
Quick Project Steps
Gather Materials:
Tublet beads. StormDuo beads in two colors (e.g., green and white). 11/0 seed beads. Dragon Thread (2-3 feet). Size 11 needle (size 10 or 12 can also be used). Wire guards and earring hooks.
Prepare Thread and Beads:
Thread 2-3 feet of Dragon Thread onto a size 11 needle. Arrange the StormDuo beads by their orientation (‘C’ and reverse ‘C’ shapes).
Create the Base:
Pick up alternating Tublet and StormDuo beads. Form a loop and secure with a knot to create the base shape.
Add Seed Beads:
Insert 11/0 seed beads between StormDuo pairs. Pass through all beads again to reinforce the design.
Build the Floral Diamond Shape:
Add additional StormDuos and seed beads to form a diamond shape. Repeat the pattern around the earring.
Incorporate a Second Color:
Introduce the second color of StormDuo beads. Place these beads in alternating positions for a layered floral effect.
Reinforce the Design:
Pass through all beads and connections multiple times for added durability.
Attach the Wire Guard:
Add a wire guard at the top of the earring and connect it to an ear hook. Ensure the thread is secure and tight.
Finish the Earring:
Trim excess thread and check for symmetry. Make final adjustments to ensure the earring hangs properly.
Learn how to create beautiful and artistic RounDuo Bangle Stacker Bracelets in this DIY jewelry-making tutorial. Using RounDuo or RounDuo Mini beads paired with 11/0, 15/0, and 8/0 seed beads, this video will guide you through each step, from selecting materials to finishing with a clasp or continuous bangle design.
Learn how to create beautiful and artistic RounDuo Bangle Stacker Bracelets in this DIY jewelry-making tutorial. Using RounDuo or RounDuo Mini beads paired with 11/0, 15/0, and 8/0 seed beads, this video will guide you through each step, from selecting materials to finishing with a clasp or continuous bangle design. Perfect for both beginners and advanced beaders, this project allows for endless creativity with color combinations. Shop the materials needed and follow along to create your own unique bracelet!
Glasgow Rose Embroidered Pendant - DIY Jewelry Making Tutorial by PotomacBeads
Glasgow Rose Embroidered Pendant - DIY Jewelry Making Tutorial by PotomacBeads
Watch Anna Tonnesen as she provides detailed step by step tutorial instructions to learn to embroider with beads. Create the Glasgow Rose pendant or create your own masterpiece of DIY jewelry following this project tutorial. Learn how to lay out your embroidery project, cut and shape your surface, sew on beads, apply the backing and seem the sides of the piece.
Comet Earrings - DIY Jewelry Making Tutorial by PotomacBeads
Flower Gem Earrings - DIY Jewelry Making Tutorial by PotomacBeads
Embroidered Rings - DIY Jewelry Making Tutorial by PotomacBeads
Good site. Good product. But the purchase today did not apply discount. Frustrating. Edit-it took a simple email to resolve the problem.
Share
Monica J.
04-24-25
Found things with your company, haven't been able to find anywhere else. Thanks!
Share
Sue G.
04-24-25
Shopping is very easy and it's WAY too easy for me to keep adding to my cart! :)
Share
Jackie C.
04-24-25
Free item on website did not credit as zero in my cart with qualified purchase
Share
Karen S.
04-23-25
user friendly and seamless processing
Share
Aleta B.
04-23-25
I found exactly what I needed at a reasonable price.
Share
CAROLYN D.
04-23-25
EASY
Share
Joy P.
04-23-25
So easy to order.
Share
Sonja G.
04-23-25
Didn’t really have many color choices
Share
Loading...
Only Visible on Admin Mode
Item Description
Learn to create beautiful floral-inspired earrings with a unique layered design, ideal for special occasions or as personalized gifts. Use Tublet beads, StormDuo beads in two colors, 11/0 seed beads, Dragon Thread, and wire guards to craft this intricate project. Master beadweaving techniques like arranging StormDuos into floral shapes, creating diamond patterns, and securing the design with wire guards and ear hooks. Experiment with different bead colors, sizes, and patterns to adapt the earrings for various styles or occasions.
Designer's Material List
The designer's suggested colors & materials:
StormDuo Beads - Jet Red Luster (Metallic Green), 16 Beads
BeadTec DragonThread - Green | Size 8 (Thick) | 50 Meter Spool, ~4 Feet
Project Steps
Gather Materials:
Tublet beads. StormDuo beads in two colors (e.g., green and white). 11/0 seed beads. Dragon Thread (2-3 feet). Size 11 needle (size 10 or 12 can also be used). Wire guards and earring hooks.
Prepare Thread and Beads:
Thread 2-3 feet of Dragon Thread onto a size 11 needle. Arrange the StormDuo beads by their orientation (‘C’ and reverse ‘C’ shapes).
Create the Base:
Pick up alternating Tublet and StormDuo beads. Form a loop and secure with a knot to create the base shape.
Add Seed Beads:
Insert 11/0 seed beads between StormDuo pairs. Pass through all beads again to reinforce the design.
Build the Floral Diamond Shape:
Add additional StormDuos and seed beads to form a diamond shape. Repeat the pattern around the earring.
Incorporate a Second Color:
Introduce the second color of StormDuo beads. Place these beads in alternating positions for a layered floral effect.
Reinforce the Design:
Pass through all beads and connections multiple times for added durability.
Attach the Wire Guard:
Add a wire guard at the top of the earring and connect it to an ear hook. Ensure the thread is secure and tight.
Finish the Earring:
Trim excess thread and check for symmetry. Make final adjustments to ensure the earring hangs properly.
Bullet 1
Bullet 2
Bullet 3
You must be logged in to access the wishlist feature.