
- Jewelry-Making Supplies ▾
Design Jewelry with Confidence!
Seed Beads
Thread, Wire, & Stringing Materials
Athenacast Findings & Components
Everything Else
- Kits & Collections ▾
Assemble Your World
Kits & Collections
- Subscriptions ▾
Want monthly Beading Happiness?
Subscriptions
- Learn to Make ▾
Want to learn more?
- Discounts & Deals ▾
Explore Today's Promotions!
- Jewelry-Making Supplies
- Kits & Collections
- Subscriptions
- Learn to Make
- Discounts & Deals
-
Seed Beads
Thread, Wire, & Stringing Materials
Findings & Components
Everything Else
-
Kits & Collections
-
Subscriptions
- Home
- How to Make Jewelry
- Projects By Bead Type
- Round Bead Projects
- Wire Fidget Ring Tutorial
Wire Fidget Ring Tutorial


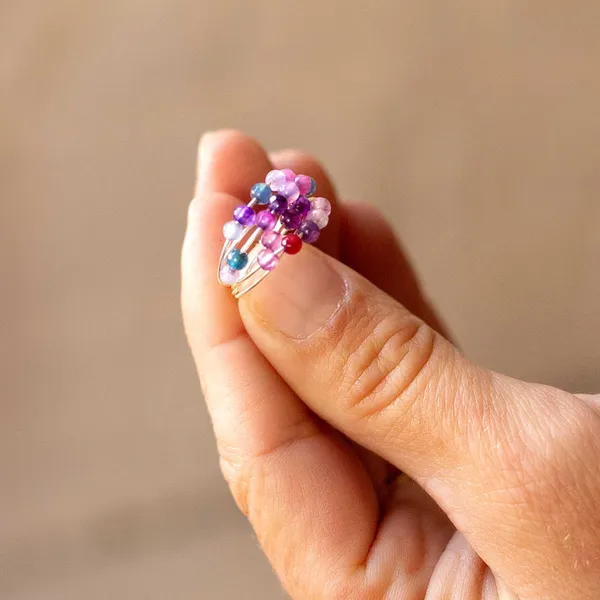
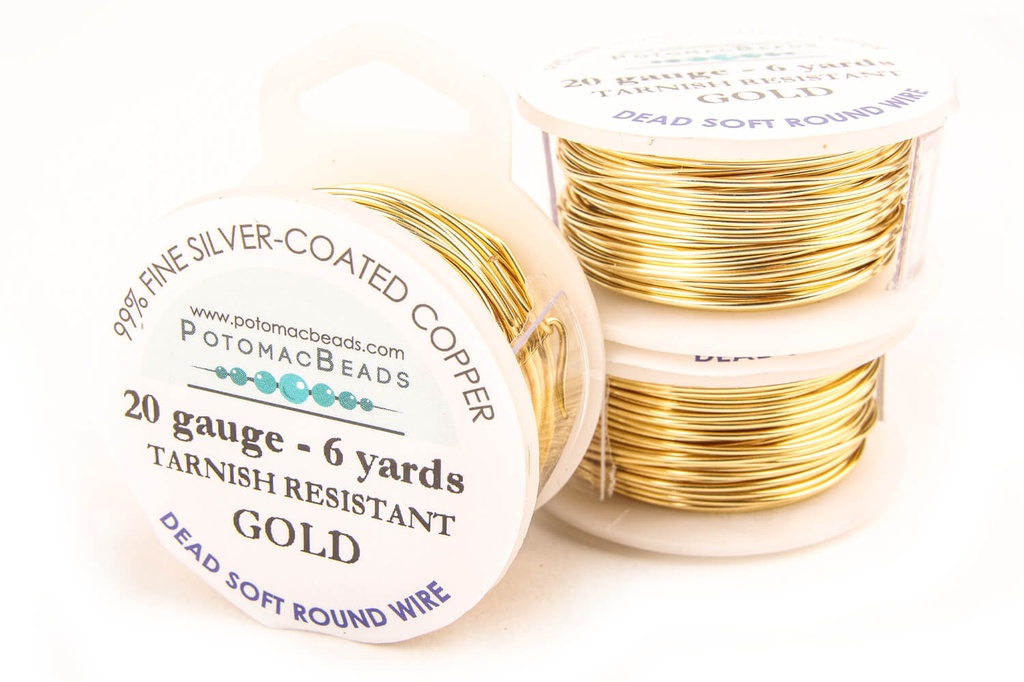
Step 1: Choose Your Materials
Step 1: Choose Your Materials


Step 2: Watch the
Video Tutorial
Step 2: Watch the
Video Tutorial
Step 3: Need More Help? Follow these Steps
Step 3: Need More Help? Follow these Steps

Quick Project Steps
Quick Project Steps
Step 4: Pick Your Own Colors
Step 4: Pick Your Own Colors
Step 5: Need Any Extra Materials?
Step 5: Need Any Extra Materials?


Step 5: Need Any Extra Materials?
Step 5: Need Any Extra Materials?


Step 6: Choose Your Next Project
Step 6: Choose Your Next Project
- In this latest tutorial from PotomacBeads, Allie shows how to make the Coiled Wire Earrings using Artistic Wire and beads. Technique Learned: Wire Working The Designer's suggested colors and materials: - Gemstone 8mm Round - Magnesite Turquoise Matte, ~4 Pieces - Extra Beads Optional (Czech Rondelles 4x7mm - Turquoise), ~2 Pieces - Potomax Jeweler's Wire 20G - Silver Plated, ~1 Foot - Potomax Jeweler's Wire 24G - Silver Plated, ~4 Feet Looking for a new and fun jewelry making project?In this latest tutorial from PotomacBeads, Allie shows how to make the Coiled Wire Earrings using Artistic Wire and beads. Technique Learned: Wire Working The Designer's suggested colors and materials: - Gemstone 8mm Round - Magnesite Turquoise Matte, ~4 Pieces - Extra Beads Optional (Czech Rondelles 4x7mm - Turquoise), ~2 Pieces - Potomax Jeweler's Wire 20G - Silver Plated, ~1 Foot - Potomax Jeweler's Wire 24G - Silver Plated, ~4 Feet Looking for a new and fun jewelry making project? Check out this latest tutorial from PotomacBeads! Allie shows how to make the Coiled Wire Earrings using Artistic Wire and beads. You'll love the finished product, and you'll be proud to say you made it yourself! Begin with the 20 gauge wire and intersect it with the 24 gauge wire, coil it tightly over the top and underneath. Make 26 coils. Take the wire cutters and cut flush, tuck in the ends to keep yourself from getting poked! Take a second piece of 20 gauge wire and using the round nose pliers, make a small loop to form an eyepin. Slide the loop onto the first piece of wire. Make another coiled section on the other side of the loop. Slide the two sections of loops to the middle of the wire. Slide an 8mm bead down the center wire. Fold the coiled sections around the bead and twist the wire to hold the bead in place. Put on another bead and add a new set of coils to both the left and right side of the bead. Fold the coiled sections around the bead as before. Trim the wire. Slide on a Czech rondelle and create a loop on top of the bead. Put the earwire onto the loop. Make sure it is sitting correct so the earring faces forward when wearing. Wirework is a very versatile jewelry making technique that can be used with a variety of beads and materials. It is a great way to add texture and interest to your jewelry designs. Coiled wire earrings are a great way to add a touch of style to any outfit. All you need is a few tools and supplies and you'll be on your way to creating beautiful jewelry.
Read More


Step 6: Choose Your Next Project
Step 6: Choose Your Next Project
- Glasgow Rose Embroidered Pendant - DIY Jewelry Making Tutorial by PotomacBeads
- Glasgow Rose Embroidered Pendant - DIY Jewelry Making Tutorial by PotomacBeads
- Comet Earrings - DIY Jewelry Making Tutorial by PotomacBeads
- Flower Gem Earrings - DIY Jewelry Making Tutorial by PotomacBeads
- Embroidered Rings - DIY Jewelry Making Tutorial by PotomacBeads
Join Our Growing Community
Join Our Growing Community


Our Testimonials
Our Testimonials
- 55943 (83.7%)
- 4809 (11.4%)
- 3293 (4.1%)
- 230 (0.4%)
- 123 (0.3%)
- Favorite Reviews
- Highest to Lowest
- Newest to Oldest
- All Ratings
- 5 ★ Reviews
- 4 ★ Reviews
- 3 ★ Reviews
- 2 ★ Reviews
- 1 ★ Reviews
Loading...
Only Visible on Admin Mode
Item Description
Designer's Material List
Project Steps
Highest Quality
Products
100% Money
Back Guarantee
Fast
Shipping
Best Teaching &
Customer Service
You'll want these emails...
Get Free Projects & Inspiration
Get Free Projects & Inspiration
- Bullet 1
- Bullet 2
- Bullet 3

240 N Prospect St. Hagerstown, MD 21740

(301) 393-4667

hello@potomacbeads.com


Copyright © PotomacBeads