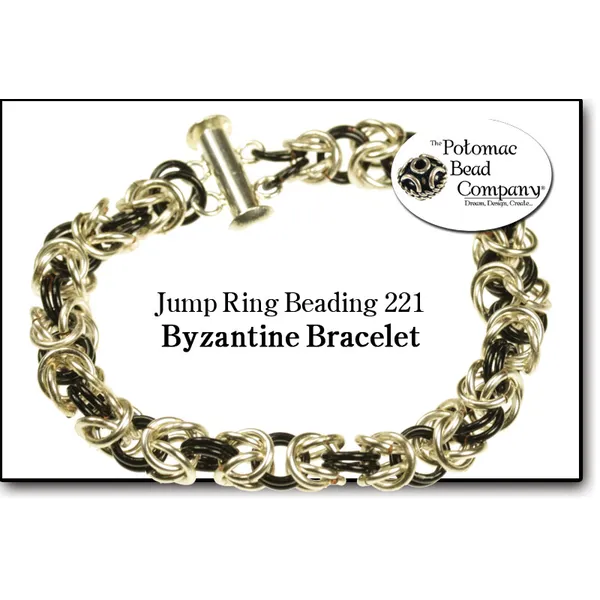
This tutorial from The Potomac Bead Company shows you how to use jump rings to create the byzantine pattern. This is usually one of the first jump ring or chain maille patterns that students will learn, and can be use to create earrings, necklaces, bracelets, pendants, and more. You can also use a variety of different sizes, shapes, cuts, and colors of jump rings in the pattern, as long as the sizes are all relative. Enjoy!
Open a set of aluminum jump rings.
Use 20 gauge wire to mark the start of your bracelet for orientation.
Attach two jump rings through the initial two, followed by another set of two, creating a base pattern of three sets of two rings.
Bend the first set of rings back, then open the middle set to create a channel.
Insert two new rings into the channel, forming the start of the Byzantine pattern.
Repeat the process: add two rings, bend back the last set, open the middle set, and add two new rings into the channel.
Continue until the bracelet reaches the desired length.
Attach a clasp to finish the bracelet.
Create a double or tripple leather wrap with an extra flair. Use seed beads to create a delicate border to showcase a mosaic of gemstones, crystals and glass. This wrap is comfortable to wear and makes a great piece to take (or make) on a summer vacation destination.
Create a double or tripple leather wrap with an extra flair. Use seed beads to create a delicate border to showcase a mosaic of gemstones, crystals and glass. This wrap is comfortable to wear and makes a great piece to take (or make) on a summer vacation destination.
Glasgow Rose Embroidered Pendant - DIY Jewelry Making Tutorial by PotomacBeads
Glasgow Rose Embroidered Pendant - DIY Jewelry Making Tutorial by PotomacBeads
Watch Anna Tonnesen as she provides detailed step by step tutorial instructions to learn to embroider with beads. Create the Glasgow Rose pendant or create your own masterpiece of DIY jewelry following this project tutorial. Learn how to lay out your embroidery project, cut and shape your surface, sew on beads, apply the backing and seem the sides of the piece.
Comet Earrings - DIY Jewelry Making Tutorial by PotomacBeads
Flower Gem Earrings - DIY Jewelry Making Tutorial by PotomacBeads
Embroidered Rings - DIY Jewelry Making Tutorial by PotomacBeads
I usually find the beads I need. The selection on Delicas is realy good. I usually get quick shipping.
Share
Norma I.
04-22-25
Todo muy bien, como siempre.
Share
Michelle L.
04-22-25
I like the express shipping!!
Share
Mary L.
04-22-25
Good
Share
Valari G.
04-22-25
So far very easy
Share
Deborah L.
04-22-25
Easy to manipulate! Love the designs! I’ll be back as I’ve been looking for new designs.
Share
Judith M.
04-21-25
Good
Share
Cindy S.
04-21-25
Denied a 50% discount on item because not a new customer....was NOT STATED YOU HAD TO BE A NEW CUSTOMER TO GWT DISCOUNT
Share
Anne D.
04-21-25
Love all the choices
Share
MJC
04-21-25
Fast and easy!
Share
Loading...
Only Visible on Admin Mode
Item Description
This tutorial from The Potomac Bead Company shows you how to use jump rings to create the byzantine pattern. This is usually one of the first jump ring or chain maille patterns that students will learn, and can be use to create earrings, necklaces, bracelets, pendants, and more. You can also use a variety of different sizes, shapes, cuts, and colors of jump rings in the pattern, as long as the sizes are all relative. Enjoy!
Open a set of aluminum jump rings.
Use 20 gauge wire to mark the start of your bracelet for orientation.
Attach two jump rings through the initial two, followed by another set of two, creating a base pattern of three sets of two rings.
Bend the first set of rings back, then open the middle set to create a channel.
Insert two new rings into the channel, forming the start of the Byzantine pattern.
Repeat the process: add two rings, bend back the last set, open the middle set, and add two new rings into the channel.
Continue until the bracelet reaches the desired length.
Attach a clasp to finish the bracelet.
Bullet 1
Bullet 2
Bullet 3
You must be logged in to access the wishlist feature.