- Jewelry-Making Supplies ▾
Design Jewelry with Confidence!
Seed Beads
Thread, Wire, & Stringing Materials
Athenacast Findings & Components
Everything Else
- Kits & Collections ▾
Assemble Your World
Kits & Collections
- Subscriptions ▾
Want monthly Beading Happiness?
Subscriptions
- Learn to Make ▾
Want to learn more?
- Discounts & Deals ▾
Explore Today's Promotions!
- Jewelry-Making Supplies
- Kits & Collections
- Subscriptions
- Learn to Make
- Discounts & Deals
-
Seed Beads
Thread, Wire, & Stringing Materials
Findings & Components
Everything Else
-
Kits & Collections
-
Subscriptions
- Home
- How to Make Jewelry
- Projects By Bead Type
- Cup Button Projects
- Cups of Roses Bracelet/Necklace …
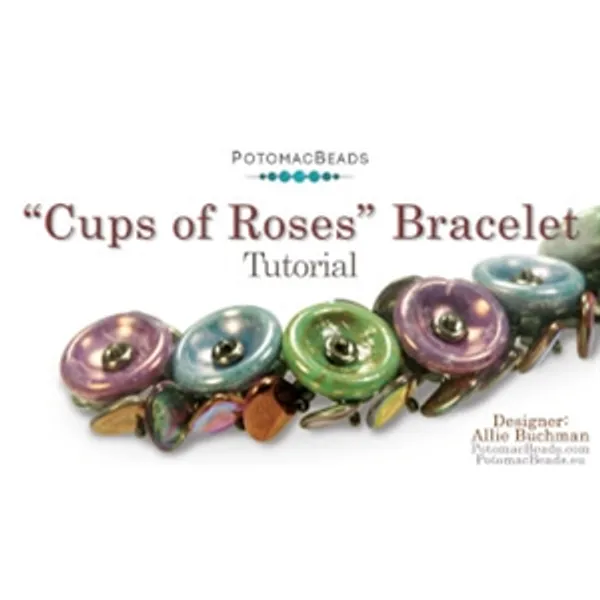
Cups of Roses Bracelet/Necklace Tutorial

Step 1: Choose Your Materials
Step 1: Choose Your Materials
Step 2: Watch the
Video Tutorial
Step 2: Watch the
Video Tutorial
Step 3: Need More Help? Follow these Steps
Step 3: Need More Help? Follow these Steps

Quick Project Steps
Quick Project Steps
1.Using a size 10 needle, put a stop bead onto about 6 feet of .006 Wildfire thread. Pick up 8 seed beads and thread back through the first 6 beads. This forms the first loop for the right angle weave.
2.Watch the Cup of Roses Bracelet tutorial to follow along with Allie’s step-by-step directions to create the charming button bracelet.
3.Reinforce the clasp when you get back to the end of the project. Bring the needle and thread down into the back of the bracelet and tie off using a bridge thread. Trim down the ends and use a tiny dab of glue on the knot.
You’ll love the fun, funky fringe on the Cups of Roses Bracelet. This bracelet doesn’t take too long to make and would make a great gift for someone special.
Step 5: Need Any Extra Materials?
Step 5: Need Any Extra Materials?
Step 5: Need Any Extra Materials?
Step 5: Need Any Extra Materials?
Step 6: Choose Your Next Project
Step 6: Choose Your Next Project
- Learn how to create beautiful and artistic RounDuo Bangle Stacker Bracelets in this DIY jewelry-making tutorial. Using RounDuo or RounDuo Mini beads paired with 11/0, 15/0, and 8/0 seed beads, this video will guide you through each step, from selecting materials to finishing with a clasp or continuous bangle design.Learn how to create beautiful and artistic RounDuo Bangle Stacker Bracelets in this DIY jewelry-making tutorial. Using RounDuo or RounDuo Mini beads paired with 11/0, 15/0, and 8/0 seed beads, this video will guide you through each step, from selecting materials to finishing with a clasp or continuous bangle design. Perfect for both beginners and advanced beaders, this project allows for endless creativity with color combinations. Shop the materials needed and follow along to create your own unique bracelet!
Read More
Step 6: Choose Your Next Project
Step 6: Choose Your Next Project
- Glasgow Rose Embroidered Pendant - DIY Jewelry Making Tutorial by PotomacBeads
- Glasgow Rose Embroidered Pendant - DIY Jewelry Making Tutorial by PotomacBeads
- Comet Earrings - DIY Jewelry Making Tutorial by PotomacBeads
- Flower Gem Earrings - DIY Jewelry Making Tutorial by PotomacBeads
- Embroidered Rings - DIY Jewelry Making Tutorial by PotomacBeads
Join Our Growing Community
Join Our Growing Community


Our Testimonials
Our Testimonials
- 55929 (83.7%)
- 4807 (11.4%)
- 3293 (4.1%)
- 229 (0.4%)
- 124 (0.3%)
- Favorite Reviews
- Highest to Lowest
- Newest to Oldest
- All Ratings
- 5 ★ Reviews
- 4 ★ Reviews
- 3 ★ Reviews
- 2 ★ Reviews
- 1 ★ Reviews
Loading...
Only Visible on Admin Mode
Item Description
Designer's Material List
Project Steps
1.Using a size 10 needle, put a stop bead onto about 6 feet of .006 Wildfire thread. Pick up 8 seed beads and thread back through the first 6 beads. This forms the first loop for the right angle weave.
2.Watch the Cup of Roses Bracelet tutorial to follow along with Allie’s step-by-step directions to create the charming button bracelet.
3.Reinforce the clasp when you get back to the end of the project. Bring the needle and thread down into the back of the bracelet and tie off using a bridge thread. Trim down the ends and use a tiny dab of glue on the knot.
You’ll love the fun, funky fringe on the Cups of Roses Bracelet. This bracelet doesn’t take too long to make and would make a great gift for someone special.
Highest Quality
Products
100% Money
Back Guarantee
Fast
Shipping
Best Teaching &
Customer Service
You'll want these emails...
Get Free Projects & Inspiration
Get Free Projects & Inspiration
- Bullet 1
- Bullet 2
- Bullet 3
Copyright © PotomacBeads


