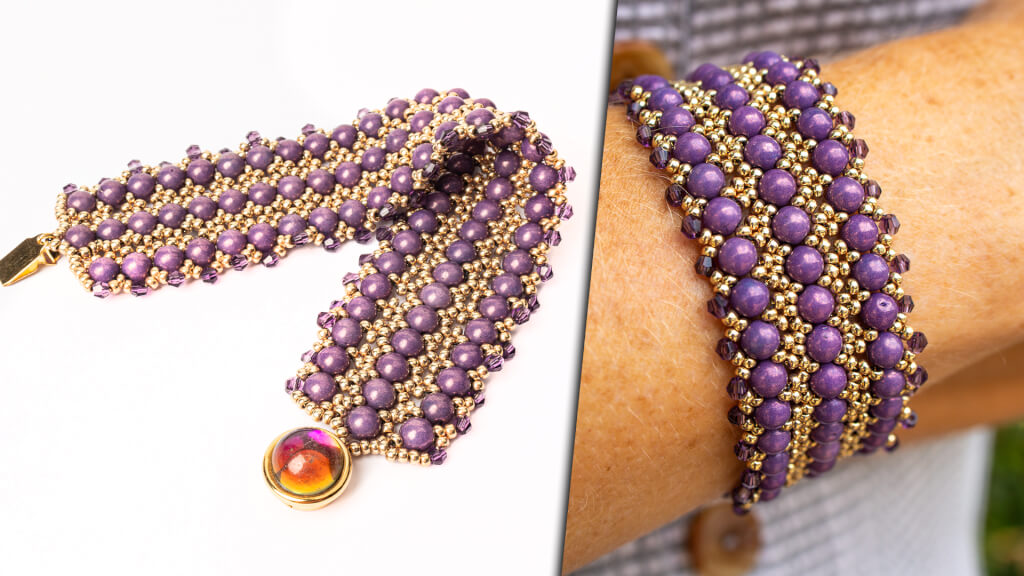
Create a stunning Triple Lace RounDuo Bracelet with this detailed DIY jewelry-making tutorial. Learn how to use RounDuo beads, Miyuki seed beads, Czech cabochons, and Potomac crystal bicones to craft a wide, elegant bracelet perfect for any occasion. This video will guide you through each step, from adding the clasp to creating decorative picot trims and reinforcing your design. Ideal for beading enthusiasts and DIY crafters, this tutorial emphasizes customization and creativity. Grab your materials, follow along, and create your unique piece today!
Claspgarten Infinite Box Push Clasp for Cabochons 10mm | 12mm | 1-Strand | Real 24k Gold Plated, 1 piece
Step 3: Need More Help? Follow these Steps
Quick Project Steps
Prepare Your Materials: Gather RounDuo beads, Miyuki seed beads (11/0), Czech cabochons, Potomac crystal bicones, and a clasp.
Start with the Center Row: Cut a 5-foot length of thread and add a stop bead. String one RounDuo bead followed by one 11/0 seed bead, repeating until the center row is the desired length for your bracelet.
Attach the Clasp: Add two 11/0 seed beads, pass through the clasp loop, add two more seed beads, and return through the RounDuo beads.
Create the Picot Trim: On each side of the center row, add a right-angle weave using one seed bead and a group of four beads to form a decorative trim.
Add Additional Rows: Attach a new row of RounDuo beads by connecting them to the picot trim. Repeat on the opposite side.
Finish with Crystals: Add Potomac crystal bicones along the outer edges for extra sparkle. Secure the threads by tying knots and burning the ends.
Learn how to create beautiful and artistic RounDuo Bangle Stacker Bracelets in this DIY jewelry-making tutorial. Using RounDuo or RounDuo Mini beads paired with 11/0, 15/0, and 8/0 seed beads, this video will guide you through each step, from selecting materials to finishing with a clasp or continuous bangle design.
Learn how to create beautiful and artistic RounDuo Bangle Stacker Bracelets in this DIY jewelry-making tutorial. Using RounDuo or RounDuo Mini beads paired with 11/0, 15/0, and 8/0 seed beads, this video will guide you through each step, from selecting materials to finishing with a clasp or continuous bangle design. Perfect for both beginners and advanced beaders, this project allows for endless creativity with color combinations. Shop the materials needed and follow along to create your own unique bracelet!
Glasgow Rose Embroidered Pendant - DIY Jewelry Making Tutorial by PotomacBeads
Glasgow Rose Embroidered Pendant - DIY Jewelry Making Tutorial by PotomacBeads
Watch Anna Tonnesen as she provides detailed step by step tutorial instructions to learn to embroider with beads. Create the Glasgow Rose pendant or create your own masterpiece of DIY jewelry following this project tutorial. Learn how to lay out your embroidery project, cut and shape your surface, sew on beads, apply the backing and seem the sides of the piece.
Comet Earrings - DIY Jewelry Making Tutorial by PotomacBeads
Flower Gem Earrings - DIY Jewelry Making Tutorial by PotomacBeads
Embroidered Rings - DIY Jewelry Making Tutorial by PotomacBeads
Always a good experience. Great selection at competitive pricing.
Share
Sande G.
03-22-25
The tutorials that you give are absolutely wonderful and so appreciated. I am able to look at them again and again until I’m able to figure out how to complete the item. Thank you so much for sharing these patterns with us for free.
Share
Clare S.
03-21-25
Love it
Share
Kyle E.
03-21-25
Amazing selection, high quality, and even better tutorials.
Share
Lynda N.
03-21-25
Still can't find the draping pearls kit or tutorial!!!
Share
Tobi M.
03-21-25
They have good customer service, good quality beads and products.
Share
Louise S.
03-21-25
Reviews indicate supplies may not be complete. I was hoping to ship this to another address but didn’t see that option available. So I’ll need to pay two shipping fees.
Share
Amena
03-21-25
Great experience. The website is clear and easy to navigate. The products are great and they have a good variety of items.
Share
David M.
03-21-25
Found it extremely difficult to bring up “oval clasp”. Searched the whole site and would key in “oval clasp” and wouldn’t come up. Was ready to cancel order out of frustration.
Share
Alison E.
03-21-25
Love Potomac Beads!!
Share
Loading...
Only Visible on Admin Mode
Item Description
Create a stunning Triple Lace RounDuo Bracelet with this detailed DIY jewelry-making tutorial. Learn how to use RounDuo beads, Miyuki seed beads, Czech cabochons, and Potomac crystal bicones to craft a wide, elegant bracelet perfect for any occasion. This video will guide you through each step, from adding the clasp to creating decorative picot trims and reinforcing your design. Ideal for beading enthusiasts and DIY crafters, this tutorial emphasizes customization and creativity. Grab your materials, follow along, and create your unique piece today!
Designer's Material List
The designer's suggested colors & materials:
RounDuo Beads - White Lila Vega Luster 5mm, 90 beads
Claspgarten Infinite Box Push Clasp for Cabochons 10mm | 12mm | 1-Strand | Real 24k Gold Plated, 1 piece
Project Steps
Prepare Your Materials: Gather RounDuo beads, Miyuki seed beads (11/0), Czech cabochons, Potomac crystal bicones, and a clasp.
Start with the Center Row: Cut a 5-foot length of thread and add a stop bead. String one RounDuo bead followed by one 11/0 seed bead, repeating until the center row is the desired length for your bracelet.
Attach the Clasp: Add two 11/0 seed beads, pass through the clasp loop, add two more seed beads, and return through the RounDuo beads.
Create the Picot Trim: On each side of the center row, add a right-angle weave using one seed bead and a group of four beads to form a decorative trim.
Add Additional Rows: Attach a new row of RounDuo beads by connecting them to the picot trim. Repeat on the opposite side.
Finish with Crystals: Add Potomac crystal bicones along the outer edges for extra sparkle. Secure the threads by tying knots and burning the ends.
Bullet 1
Bullet 2
Bullet 3
You must be logged in to access the wishlist feature.