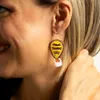
Create stunning Soar High Earrings with this detailed DIY jewelry-making tutorial. Learn to use Athena cast teardrop forms, Miyuki seed beads (sizes 8/0, 11/0, and 15/0), and Miyuki Delicas to craft unique earrings with brick stitch and peyote stitch techniques. Follow along step-by-step and make your own artistic earrings that resemble hot air balloons. Perfect for beaders of all levels, this project allows you to explore your creativity and create beautiful handmade jewelry.
Prepare Materials: Gather Athena cast teardrop forms, Miyuki seed beads (8/0, 11/0, 15/0), Miyuki Delicas, Dragon Thread (size 8), and a beading needle.
Start Brick Stitch: Begin by tying the thread to the form and starting the first row of brick stitch using 8/0 seed beads.
Add Second Row: Continue brick stitching, adding 11/0 and 15/0 seed beads around the form.
Create Firebox (Optional): Use bicones to create a firebox effect, adding it between the rows of beads.
Complete Brick Stitch: Finish the brick stitch by adding the remaining 11/0 and 15/0 beads.
Add Inner Design: Use a combination of 8/0, 11/0, and 15/0 beads to create the inner design, resembling a watermelon or hot air balloon.
Construct Basket: Create the basket using peyote stitch with Delicas, forming 18 rows of three beads.
Attach Basket to Form: Secure the basket to the bottom of the earring form using additional beads.
Attach Ear Wire: Finally, attach the ear wire to complete the earring.
Learn how to create beautiful and artistic RounDuo Bangle Stacker Bracelets in this DIY jewelry-making tutorial. Using RounDuo or RounDuo Mini beads paired with 11/0, 15/0, and 8/0 seed beads, this video will guide you through each step, from selecting materials to finishing with a clasp or continuous bangle design.
Learn how to create beautiful and artistic RounDuo Bangle Stacker Bracelets in this DIY jewelry-making tutorial. Using RounDuo or RounDuo Mini beads paired with 11/0, 15/0, and 8/0 seed beads, this video will guide you through each step, from selecting materials to finishing with a clasp or continuous bangle design. Perfect for both beginners and advanced beaders, this project allows for endless creativity with color combinations. Shop the materials needed and follow along to create your own unique bracelet!
Glasgow Rose Embroidered Pendant - DIY Jewelry Making Tutorial by PotomacBeads
Glasgow Rose Embroidered Pendant - DIY Jewelry Making Tutorial by PotomacBeads
Watch Anna Tonnesen as she provides detailed step by step tutorial instructions to learn to embroider with beads. Create the Glasgow Rose pendant or create your own masterpiece of DIY jewelry following this project tutorial. Learn how to lay out your embroidery project, cut and shape your surface, sew on beads, apply the backing and seem the sides of the piece.
Comet Earrings - DIY Jewelry Making Tutorial by PotomacBeads
Flower Gem Earrings - DIY Jewelry Making Tutorial by PotomacBeads
Embroidered Rings - DIY Jewelry Making Tutorial by PotomacBeads
Easy to manipulate! Love the designs! I’ll be back as I’ve been looking for new designs.
Share
Judith M.
04-21-25
Good
Share
Cindy S.
04-21-25
Denied a 50% discount on item because not a new customer....was NOT STATED YOU HAD TO BE A NEW CUSTOMER TO GWT DISCOUNT
Share
Anne D.
04-21-25
Love all the choices
Share
MJC
04-21-25
Fast and easy!
Share
Michelle H.
04-21-25
It was difficult navigating to the payment page
Share
Jan L.
04-21-25
Disappointed by out of stock items
Share
Sue K.
04-21-25
Love the kits and products. Love using the tutorial's to make different bracelets
Share
Sandra K.
04-21-25
Excellent service. Questions answered.
Share
Nancy N.
04-21-25
Great ,love it
Share
Loading...
Only Visible on Admin Mode
Item Description
Create stunning Soar High Earrings with this detailed DIY jewelry-making tutorial. Learn to use Athena cast teardrop forms, Miyuki seed beads (sizes 8/0, 11/0, and 15/0), and Miyuki Delicas to craft unique earrings with brick stitch and peyote stitch techniques. Follow along step-by-step and make your own artistic earrings that resemble hot air balloons. Perfect for beaders of all levels, this project allows you to explore your creativity and create beautiful handmade jewelry.
Designer's Material List
The designer's suggested colors & materials:
Athenacast perfect form endless drop - silver, 2 beads
Prepare Materials: Gather Athena cast teardrop forms, Miyuki seed beads (8/0, 11/0, 15/0), Miyuki Delicas, Dragon Thread (size 8), and a beading needle.
Start Brick Stitch: Begin by tying the thread to the form and starting the first row of brick stitch using 8/0 seed beads.
Add Second Row: Continue brick stitching, adding 11/0 and 15/0 seed beads around the form.
Create Firebox (Optional): Use bicones to create a firebox effect, adding it between the rows of beads.
Complete Brick Stitch: Finish the brick stitch by adding the remaining 11/0 and 15/0 beads.
Add Inner Design: Use a combination of 8/0, 11/0, and 15/0 beads to create the inner design, resembling a watermelon or hot air balloon.
Construct Basket: Create the basket using peyote stitch with Delicas, forming 18 rows of three beads.
Attach Basket to Form: Secure the basket to the bottom of the earring form using additional beads.
Attach Ear Wire: Finally, attach the ear wire to complete the earring.
Bullet 1
Bullet 2
Bullet 3
You must be logged in to access the wishlist feature.