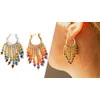
Lakshmi Embellished Hoop Earrings Tutorial

  • Picture of Accessories, Earring, Jewelry, Necklace
  • Picture of Accessories, Earring, Jewelry, Necklace, Bracelet
  • Picture of Accessories, Earring, Jewelry, Necklace
  • Picture of Accessories, Earring, Jewelry, Necklace
  • Picture of Accessories, Earring, Jewelry
  • Picture of Accessories, Earring, Jewelry
Learn to create stunning hoop earrings with seed beads, crystals, and fringe for a stylish design that doubles as wine charms or jewelry. Work with 11/0 seed beads, 2-3mm crystals, hoop earrings, thread, and a needle to craft this detailed yet straightforward project. Master brick stitch to add beads and fringe to hoop earrings, using crystals for sparkle and elegance. Customize the design with different bead colors, fringe lengths, or even adapt it into a necklace centerpiece.

Step 1: Choose Your Materials

Step 2: Watch the 
Video Tutorial

Lakshmi Embellished Hoop Earrings Tutorial
The designer's suggested colors & materials:
  • Athenacast Hoop Earrings - 16mm Premium Real Silver Plated, 1 Pair
  • Miyuki Seed Beads - Duracoat Galvanized Light Pewter 11/0 , ~3 Gram
  • Potomac Crystal Bicone Beads - Topaz 2mm, 16 Beads
  • Potomac Crystal Bicone Beads - Indicolite 2mm, 16 Beads
  • Potomac Crystal Bicone Beads - Light Siam 2mm, 16 Beads
  • Step 3: Need More Help? Follow these Steps

    steps

    Quick Project Steps

    Gather Materials: Hoop earrings. 11/0 seed beads. 2mm-3mm crystals for fringe. Thread and needle. Optional: Thread burner and scissors. Attach Thread to Hoop: Securely tie your thread to the hoop’s thicker bottom section to avoid interfering with the clasp mechanism. Start Brick Stitch: Pick up two 11/0 seed beads. Loop the thread under the hoop and pass back through the second bead to secure it. Add one bead at a time, repeating the brick stitch until the hoop’s base has an odd number of evenly spaced beads. Create Fringe: String three seed beads, a crystal pattern, and one stopper bead. Pass the thread back through all beads except the stopper to form the fringe. Attach the fringe to a base bead and repeat, varying lengths for symmetry. Complete the Fringe Design: Continue adding fringe, increasing length toward the center and decreasing symmetrically. Adjust spacing as needed for a polished look. Add Top Embellishments: Use the brick stitch base to add rows of seed beads above the fringe for additional texture. Weave beads securely to enhance the overall design. Secure and Finish: Tie off the thread and trim any excess. Use a thread burner for a clean, professional finish. Customize Your Earrings: Experiment with bead colors, fringe patterns, or adapt the design into necklaces or charms.

    Step 5: Need Any Extra Materials?

    • Potomacbeads Beading Ruler | Ultimate | Crystal | 9x3"
    • BeadTec DragonThread - Four Color Selection Size 8 50 Meter Spool
    • BeadTec DragonThread - Four Dark Color Selection | Size 6 (Medium) | 50 Meter Spool
    • Plastic Caliper Tool - White
    • BeadTec Beading Needles Sizes 10, 11, 12 | Mix Pack of 6
    • Thread Zap II

    Step 5: Need Any Extra Materials?

    Potomacbeads Beading Ruler | Advanced | 6x3"
    Beading Mat - Beading Design Mat
    PotomacBeads Pliers - Round Nose Pliers

    Step 6: Choose Your Next Project

    • Learn how to create beautiful and artistic RounDuo Bangle Stacker Bracelets in this DIY jewelry-making tutorial. Using RounDuo or RounDuo Mini beads paired with 11/0, 15/0, and 8/0 seed beads, this video will guide you through each step, from selecting materials to finishing with a clasp or continuous bangle design.

      Read More

    Step 6: Choose Your Next Project

    • Glasgow Rose Embroidered Pendant - DIY Jewelry Making Tutorial by PotomacBeads
    • Glasgow Rose Embroidered Pendant - DIY Jewelry Making Tutorial by PotomacBeads

    Watch Anna Tonnesen as she provides detailed step by step tutorial instructions to learn to embroider with beads. Create the Glasgow Rose pendant or create your own masterpiece of DIY jewelry following this project tutorial. Learn how to lay out your embroidery project, cut and shape your surface, sew on beads, apply the backing and seem the sides of the piece.
    • Comet Earrings - DIY Jewelry Making Tutorial by PotomacBeads
    • Flower Gem Earrings - DIY Jewelry Making Tutorial by PotomacBeads
    • Embroidered Rings - DIY Jewelry Making Tutorial by PotomacBeads

    Join Our Growing Community

    Community profile photo 1
    Community profile photo 2
    Community profile photo 3
    Community profile photo 4

    Our Testimonials

    Only Visible on Admin Mode

    Item Description

    Learn to create stunning hoop earrings with seed beads, crystals, and fringe for a stylish design that doubles as wine charms or jewelry. Work with 11/0 seed beads, 2-3mm crystals, hoop earrings, thread, and a needle to craft this detailed yet straightforward project. Master brick stitch to add beads and fringe to hoop earrings, using crystals for sparkle and elegance. Customize the design with different bead colors, fringe lengths, or even adapt it into a necklace centerpiece.

    Designer's Material List

    The designer's suggested colors & materials:
  • Athenacast Hoop Earrings - 16mm Premium Real Silver Plated, 1 Pair
  • Miyuki Seed Beads - Duracoat Galvanized Light Pewter 11/0 , ~3 Gram
  • Potomac Crystal Bicone Beads - Topaz 2mm, 16 Beads
  • Potomac Crystal Bicone Beads - Indicolite 2mm, 16 Beads
  • Potomac Crystal Bicone Beads - Light Siam 2mm, 16 Beads
  • Project Steps

    Gather Materials: Hoop earrings. 11/0 seed beads. 2mm-3mm crystals for fringe. Thread and needle. Optional: Thread burner and scissors. Attach Thread to Hoop: Securely tie your thread to the hoop’s thicker bottom section to avoid interfering with the clasp mechanism. Start Brick Stitch: Pick up two 11/0 seed beads. Loop the thread under the hoop and pass back through the second bead to secure it. Add one bead at a time, repeating the brick stitch until the hoop’s base has an odd number of evenly spaced beads. Create Fringe: String three seed beads, a crystal pattern, and one stopper bead. Pass the thread back through all beads except the stopper to form the fringe. Attach the fringe to a base bead and repeat, varying lengths for symmetry. Complete the Fringe Design: Continue adding fringe, increasing length toward the center and decreasing symmetrically. Adjust spacing as needed for a polished look. Add Top Embellishments: Use the brick stitch base to add rows of seed beads above the fringe for additional texture. Weave beads securely to enhance the overall design. Secure and Finish: Tie off the thread and trim any excess. Use a thread burner for a clean, professional finish. Customize Your Earrings: Experiment with bead colors, fringe patterns, or adapt the design into necklaces or charms.